 bluename
 How to Make Mango Yogurt Granola Layered No Bake Breakfast Dessert Cups
I used to dread mornings. You know the feeling — alarm goes off, you hit snooze three times, and suddenly you're running out the door with nothing but coffee in your stomach. That was me for years. Then I started experimenting with make-ahead breakfast ideas, and everything changed.
That's exactly why I want to show you how to make mango yogurt granola layered no bake breakfast dessert cups. These little jars changed my morning routine completely. They're creamy, crunchy, naturally sweet, and you don't even need to turn on the oven.
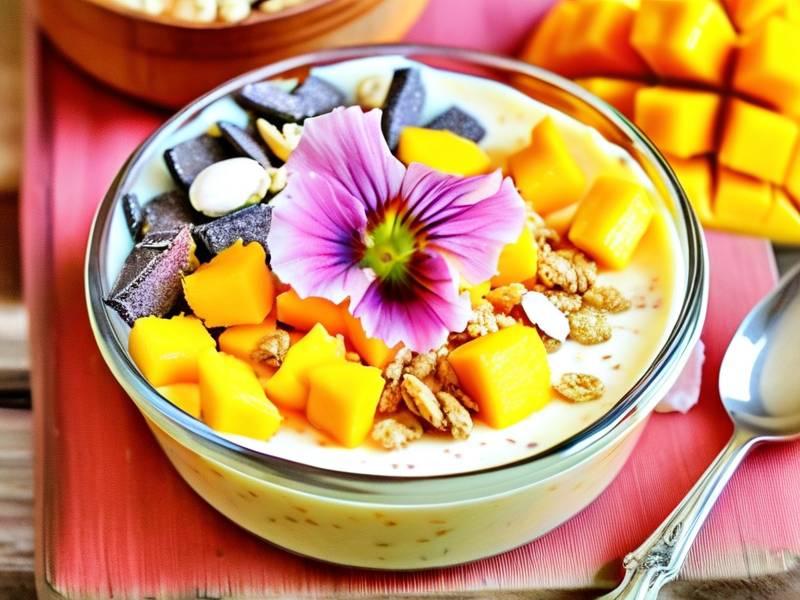
I've been testing no bake breakfast cup recipes for over three years now. I've made every mistake you can think of — soggy granola, watery yogurt, mango that turned brown overnight. After dozens of batches, I finally nailed the formula. And today I'm sharing everything I learned.
The best part? You can meal prep these mango yogurt granola cups on Sunday and eat them all week. No cooking. No stress. Just grab and go.
Why I Started Making No Bake Breakfast Dessert Cups
Let me be honest with you. I'm not a morning person. Never have been. For years, my breakfast was whatever I could grab in five seconds — usually a sad granola bar or nothing at all.
The problem was simple. I wanted something healthy, but I also wanted something that tasted like dessert. Most healthy breakfast options felt like punishment. Dry toast. Bland oatmeal. No thanks.
So I started playing around with layered yogurt cups. My first attempt was a disaster. I layered everything the night before, and by morning the granola had turned into mush. It was like eating wet cardboard. I almost gave up.
Then I discovered the trick — keep the granola separate until you're ready to eat. That one change made all the difference. Suddenly, my no bake mango yogurt granola cups tasted fresh every single time.
What Makes These Mango Yogurt Granola Cups So Good
Here's what I love about this recipe. It hits every texture and flavor note you could want.
The mango gives you natural sweetness and a tropical vibe. The yogurt brings creaminess and protein. The granola adds crunch and substance. And when you put them together in layers, it looks like something from a fancy café.
But it's not just about taste. These breakfast dessert cups are:
- High in protein thanks to Greek yogurt
- Packed with fiber from fresh mango and granola
- Naturally sweet with no refined sugar needed
- Ready in under 15 minutes
- Perfect for meal prep — lasts 4 to 5 days in the fridge
I've served these at brunch parties, and people always ask for the recipe. Nobody believes how simple they are.
What You'll Need to Make Layered Mango Yogurt Granola Cups
Let me walk you through the ingredients. I keep things flexible because I know not everyone has the same stuff in their kitchen.
For the Yogurt Layer
I use full-fat Greek yogurt. It's thicker and creamier than regular yogurt. If you want to lighten things up, non-fat Greek yogurt works too. But I find full-fat keeps you full longer.
You'll need about two cups of Greek yogurt. I sometimes mix in a spoonful of honey or maple syrup if the yogurt is too tangy. A splash of vanilla extract also adds a nice warmth.
For the Mango Layer
Fresh ripe mango is ideal. You want one that's soft but not mushy. If mango isn't in season, frozen mango chunks work great. Just thaw them and drain the excess liquid.
I usually use two large mangoes or about three cups of chunks. You can mash them with a fork for a chunky texture, or blend them smooth. I prefer somewhere in between — a rough puree that still has some body.
If you want to get fancy, add a squeeze of lime juice. It brightens up the mango and keeps it from browning.
For the Granola Layer
Here's where it gets personal. You can use store-bought granola or make your own. I've done both, and honestly, store-bought works perfectly fine for this recipe.
I look for granola with clusters — those big crunchy pieces. They hold up better and give you a satisfying bite. Honey-sweetened granola pairs really well with mango. So does coconut-flavored granola.
You'll need about one and a half cups. But feel free to adjust based on how crunchy you want each cup.
Optional Add-Ins
This is where you can really make the recipe your own. Here are some things I've tried and loved:
- Chia seeds for extra fiber and omega-3s
- Toasted coconut flakes for a tropical twist
- Sliced almonds or chopped walnuts for more crunch
- A drizzle of honey or agave on top
- Fresh mint leaves for garnish
Honestly, the possibilities are endless. I've even added a layer of peanut butter once, and it was incredible.
How to Make Mango Yogurt Granola Layered No Bake Breakfast Dessert Cups Step by Step
Alright, let's get into the actual process. I promise this is one of the easiest recipes you'll ever make.
Step 1: Prepare Your Mango Puree
Start by peeling and chopping your mangoes. Cut around the pit and scoop out the flesh. Then mash it with a fork or blend it briefly.
I like to leave some small chunks in there. It adds texture and makes each spoonful more interesting. If you're using frozen mango, make sure to drain any extra liquid after thawing. Otherwise, your cups will get watery.
Taste your mango. If it's not sweet enough, add a teaspoon of honey or maple syrup. If it's perfectly ripe, you don't need anything at all.
Step 2: Mix Your Yogurt Base
In a medium bowl, combine your Greek yogurt with vanilla extract and a sweetener of choice. I usually use one to two tablespoons of honey.
Stir until everything is smooth and well combined. Give it a taste. You want the yogurt to be slightly sweet but not overpowering. Remember, the mango and granola will add their own sweetness.
If you want a thicker consistency, you can strain your yogurt through a cheesecloth for an hour before mixing. But honestly, I rarely do this. It's an extra step that's not always necessary.
Step 3: Choose Your Cups
I use clear glass jars or small mason jars. The clear glass lets you see those beautiful layers, which makes the whole thing feel special.
You can also use plastic cups if you're making these for kids or taking them to a picnic. Just make sure whatever you use has a lid.
I've found that eight-ounce jars work perfectly. They're the right size for a single serving and easy to grab from the fridge.
Step 4: Layer Everything
Now comes the fun part. Here's the order I use:
First, spoon about two tablespoons of mango puree into the bottom of each jar. This creates a sweet base that seeps slightly into the yogurt.
Next, add a layer of yogurt. I use about three to four tablespoons per jar. Gently tap the jar on the counter to level it out.
Then comes the granola. Sprinkle about two tablespoons on top of the yogurt. Don't press it down — you want to keep those clusters intact.
Repeat the layers one more time: mango, yogurt, granola. Finish with a few extra mango chunks or a sprinkle of granola on top for looks.
Step 5: Chill or Serve
Here's the key decision. If you're eating these right away, go ahead and dig in. They're delicious immediately.
But if you're meal prepping, there's one important rule. Keep the granola separate until serving. I learned this the hard way.
Instead of layering granola inside the jar, I now pack it in a small separate container or a zip-top bag. When I'm ready to eat, I just pour it on top. The granola stays crunchy, and the yogurt stays creamy.
If you absolutely want to layer everything together, eat them within 12 hours. After that, the granola starts to soften.
My Biggest Mistakes and How to Avoid Them
I've made plenty of mistakes with this recipe. Let me save you the trouble.
Mistake 1: Using Thin, Watery Yogurt
Regular yogurt is too runny for layered cups. It seeps into the granola and creates a soggy mess. Always use Greek yogurt or strain your regular yogurt first.
Mistake 2: Not Draining Frozen Mango
Frozen mango holds a lot of water. If you don't drain it well, your cups will be swimming in liquid by day two. Pat the thawed chunks dry with a paper towel before pureeing.
Mistake 3: Layering Granola Too Early
I mentioned this already, but it's worth repeating. Granola + moisture = soggy sadness. Add it right before eating for the best texture.
Mistake 4: Skipping the Taste Test
Always taste your yogurt mixture before layering. If it's too tart, add more sweetener. If it's too sweet, add a squeeze of lemon. Small adjustments make a big difference.
Expert Tips for Perfect Mango Yogurt Granola Cups Every Time
After years of making these, I've picked up a few tricks that take them from good to great.
Use Room Temperature Yogurt
Cold yogurt is stiff and hard to layer neatly. Let it sit on the counter for 15 minutes before mixing. It spreads more easily and creates cleaner layers.
Toast Your Granola Briefly
Even store-bought granola benefits from a quick toast. Spread it on a baking sheet and pop it in a 350°F oven for five minutes. This reactivates the oils and makes it extra crunchy. Just let it cool completely before using.
Add a Pinch of Salt
A tiny pinch of sea salt in the yogurt mixture enhances all the flavors. You won't taste the salt itself, but everything else will pop more.
Experiment with Different Fruit
Mango is the star here, but you can swap it with strawberries, peaches, or pineapple. The technique stays the same. I've made a strawberry version that was equally amazing.
Make a Big Batch on Sunday
Sunday meal prep is a game changer. I make eight to ten jars at once. It takes about 20 minutes, and I have breakfast ready for the entire work week.
Why This Recipe Works for Busy Mornings
Mornings are chaotic. I get it. That's why this recipe has become a staple in my house.
There's no cooking involved. No oven. No stove. You just assemble and refrigerate. It's perfect for people who barely have time to make coffee, let alone cook breakfast.
Plus, these cups are portable. I've eaten them in the car (carefully), at my desk, and even on the train. They travel well as long as you keep the granola separate.
And nutritionally? They're solid. Greek yogurt gives you protein. Mango provides vitamins A and C. Granola adds fiber and healthy fats. It's a balanced breakfast that actually keeps you full until lunch.
According to a 2024 report from the International Food Information Council, 62% of Americans say they want breakfast options that are both healthy and convenient. These cups check both boxes. A 2023 study in the Journal of Nutrition also found that people who eat protein-rich breakfasts tend to consume fewer calories throughout the day.
Variations to Try
Once you master the basic recipe, you can start experimenting. Here are some variations I've tested and loved.
Tropical Mango Coconut Cups
Add toasted coconut flakes to the granola layer. Use coconut-flavored Greek yogurt. The combination is like a vacation in a jar.
Mango Almond Crunch Cups
Swap granola for crushed almonds and a drizzle of almond butter. This version is lower in sugar and higher in healthy fats.
Mango Chia Pudding Cups
Replace the yogurt with chia pudding. Layer with mango puree and granola. This is a great dairy-free option.
Spicy Mango Cups
Add a pinch of chili powder and lime juice to the mango puree. It sounds weird, but the sweet-heat combo is addictive.
How Long Do These Cups Last?
If you keep the granola separate, the mango yogurt layers last four to five days in the fridge. Make sure your jars are sealed tightly.
If you've already layered the granola inside, eat them within 12 to 24 hours. After that, the texture really suffers.
I don't recommend freezing these cups. The yogurt separates when thawed, and the mango gets watery. Fresh is always best.
Frequently Asked Questions
Can I use regular yogurt instead of Greek yogurt for these no bake breakfast cups?
Yes, but you'll need to strain it first. Regular yogurt is too thin and will make your layers runny. Place it in a cheesecloth-lined strainer over a bowl and refrigerate for two hours. The result is thick, creamy yogurt perfect for layering.
How do I keep granola crunchy in mango yogurt granola layered cups?
The secret is separation. Store granola in a small bag or container alongside your jar. Add it right before eating. If you must layer it inside, do so no more than 12 hours before serving.
Are these mango yogurt granola cups healthy enough for a daily breakfast?
Absolutely. With Greek yogurt, fresh mango, and granola, you're getting protein, fiber, vitamins, and healthy fats. Just watch your sweetener. If you keep added sugar low, these cups are a balanced, nutritious breakfast you can enjoy every day.
A Final Word on Making These Breakfast Cups
I hope this guide makes your mornings a little easier and a lot tastier. Learning how to make mango yogurt granola layered no bake breakfast dessert cups was one of the best kitchen habits I ever picked up. They're simple, beautiful, and endlessly customizable.
Start with the basic recipe. Get comfortable with the layering process. Then start experimenting. Maybe try a different fruit or a new granola flavor. The worst that can happen is you end up with a delicious mistake.
And trust me, even my failed batches tasted pretty good.
⚠️ Warning: This cake is high in sugar. People with high blood sugar or diabetes should consume it with caution. This is a low-sugar/sugar-free formula, consult a medical professional before consumption.





