 bluename
 How to Make Cream Cheese Peanut Butter No Bake Mini Dessert Cups Chilled Treats
I lost count of how many times I stared at a block of cream cheese in my fridge, wondering what to do with it.
You know that moment. It's late, the kids are asking for something sweet, or maybe you just need a treat after a long week. But the oven is the last thing you want to deal with.
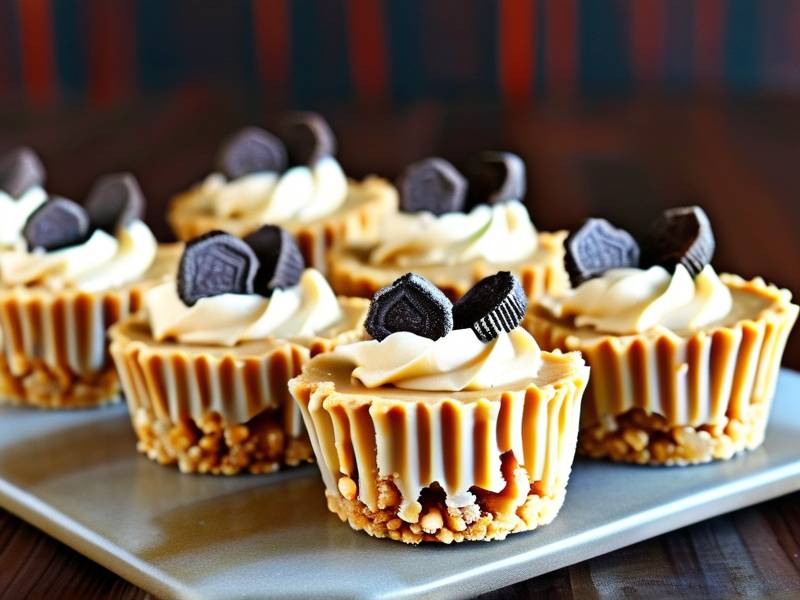
I’ve been making desserts for over a decade, mostly for family gatherings and small dinner parties.
The thing is, I genuinely hated baking for the first few years because I always burned things.
That's why I switched to no bake recipes almost entirely.
Let me tell you, this cream cheese peanut butter no bake mini dessert cups chilled treats recipe is the one that finally got my sister to stop buying store-bought cheesecakes.
It’s rich, fluffy, and has that perfect salty-sweet peanut butter kick.
Here’s the step-by-step method I use, plus all the little details I’ve picked up to make sure yours come out perfect every time.
Why I Swear by No Bake Desserts for Quick Entertaining
Life gets busy. I get it.
The appeal of a no bake dessert isn't just skipping the oven. It’s about saving time and saving your sanity.
With these cream cheese peanut butter no bake mini dessert cups chilled treats, you can have everything prepped in about 20 minutes.
The rest is just waiting for the fridge to do its magic.
This recipe is my go-to when I need a guaranteed crowd-pleaser without slaving over a hot stove.
I’ve taken these to potlucks where people literally asked me for the recipe before they even finished eating.
There is something special about individual portions. They look way more elegant than a giant slab of cake, even though they take half the effort.
Plus, making them in cups means you don't need to worry about perfect slicing at the party.
Just grab a spoon and go.
The first time I tried to make a layered dessert like this, I made a huge mistake with the crust.
I didn't chill the butter properly, so the base was a soggy mess.
That’s when I learned that structure is key.
For these mini cups, the texture of each layer matters just as much as the taste.
What Ingredients You Actually Need for Cream Cheese Peanut Butter Mini Dessert Cups
Smooth ingredients make smooth desserts.
Here's the haul I use every single week.
You don't need anything fancy or exotic for these no-bake peanut butter cream cheese cups.
Most of this is probably already in your pantry.
The Crust Base
- 1 cup graham cracker crumbs (about 8 full sheets)
- 4 tbsp unsalted butter, melted
- 2 tbsp granulated sugar
- A pinch of salt – don't skip this, it balances the sweetness
Honestly, vanilla wafers work too if you’re out of graham crackers.
I’ve even used crushed pretzels for that sweet and salty combo.
Just make sure the crumbs are fine.
Nobody likes a giant chunk of cracker in their dessert cup.
The Creamy Filling
This is the heart of the whole thing.
- 8 oz (one block) full-fat cream cheese, softened
- 1/2 cup creamy peanut butter
- 1/2 cup powdered sugar
- 1 tsp vanilla extract
- 1/2 cup heavy whipping cream, cold
Here is where my biggest tip comes in.
Do not use low-fat cream cheese for this.
I know it’s tempting to cut calories, but the texture goes weird.
It gets grainy. I made this mistake once when I was trying to be "healthy," and my cream cheese peanut butter no bake mini dessert cups chilled treats had a strange mouthfeel.
Trust me on this one.
Use the full-fat stuff.
For the peanut butter, standard commercial brands like Jif or Skippy are best.
Natural peanut butter that separates can make the filling oily.
I love the flavor of natural ones, but they don't stabilize as well in no-bake recipes.
The Topping Layer
- 1/2 cup heavy whipping cream
- 2 tbsp powdered sugar
- 1/4 cup peanut butter, melted slightly for drizzling
You can also swap the whipped cream for store-bought Cool Whip.
I won’t judge.
Sometimes you just want to get dinner on the table, and store-bought works perfectly fine.
Steps to Make Cream Cheese Peanut Butter No Bake Mini Dessert Cups Chilled Treats
Let’s get into the actual process.
This is the stuff I wish I had known when someone first showed me this concept.
Prepare Your Cups and Crust
First, grab six to eight small jars or cups.
I use those little 6-ounce mason jars, but plastic cups from the store work okay too.
Mix your graham cracker crumbs, sugar, and melted butter together.
It should look like wet sand.
Split the mixture evenly among your cups.
Here’s a trick I learned: don't press the crust down too hard.
You want some texture when you bite through all those soft layers.
Just pack it down lightly with the back of a spoon.
Put these cups in the freezer while you work on the filling.
This helps the butter set quickly, so the crust doesn't crumble when you eat it.
Beat the Cream Cheese and Peanut Butter
Take your softened cream cheese and put it in a large bowl.
Beat it with an electric mixer for about one minute until it’s totally smooth.
If you don't have an electric mixer, prepare your arm for a workout.
A hand whisk will work, but it takes ages to get out the lumps.
Add the peanut butter and vanilla.
Mix again until everything is well combined.
Don't stop here.
Scrape the sides of the bowl and beat for another minute.
The trick is to get it airy before you add the sugar.
Add your powdered sugar slowly while mixing on low speed.
If you dump it all in at once, you’ll get a sugar cloud all over your kitchen counter.
I’ve done that too many times to count.
Mix until the sugar is fully absorbed and the mixture is thick and glossy.
Fold in the Whipped Cream
This step makes the dessert fluffy instead of heavy.
Take your cold heavy whipping cream and whip it in a separate bowl with the 2 tbsp of powdered sugar.
Whip it until stiff peaks form.
When you lift the beater, the cream should stand up straight.
Gently fold the whipped cream into the cream cheese peanut butter mixture.
And when I say gently, I mean it.
Use a rubber spatula and cut straight down the middle, then across the bottom and up the side of the bowl.
Rotate the bowl as you go.
Stop folding as soon as you see no white streaks.
If you over-mix, all that air you just whipped in gets popped, and your cream cheese peanut butter no bake mini dessert cups chilled treats will end up dense and flat.
Now is the time to taste it.
I always do.
This is the "chef's privilege."
You might find you want a bit more salt here, or maybe some extra peanut butter flavor.
Sometimes I add a pinch of flaky sea salt at this stage if I’m using unsalted peanut butter.
Assembly of the Layers
Pull your cups out of the freezer.
Spoon or pipe the filling into the cups.
If you want to use a piping bag, I recommend a large star tip.
It makes the cups look like a professional bakery made them.
Make sure to distribute the filling evenly.
Level the top of the filling with a small offset spatula or just tap the cup on the counter to smooth it out.
The Chilling Process
This is where patience comes in.
You cannot rush this part.
The name "chilled treats" isn't just for show.
These need at least 4 hours in the fridge to set properly.
Honestly, if you can leave them overnight, that’s even better.
The flavors meld together during that time.
The cream cheese and peanut butter get to know each other, if that makes sense.
The texture really transforms in the fridge.
When I rush it, the cups are too soft and almost mousse-like.
When I wait, they hold their shape beautifully and slice cleanly with a spoon.
The whipped cream topping should go on right before serving.
If you put it on the night before, the topping can start to weep and get watery.
I learned this the hard way when I brought these to a brunch.
I topped everything on a Friday night, and by Saturday morning, the swirls on top had settled into sad puddles.
Flavor Variations That Work Well
Once you nail the basic process, the world is your oyster.
I change this recipe based on the season.
- Chocolate Lovers: Swap the graham cracker crust with crushed chocolate cookies. Add a tablespoon of cocoa powder to the filling.
- Cookies and Cream: Mix crushed Oreo bits into the filling after folding in the cream. It adds a great little crunch.
- Swap the Peanut Butter: Almond butter or cashew butter work well too. If you do this, you might need to adjust the powdered sugar slightly, because peanut butter adds its own sweetness.
Just pay attention to the texture.
If the filling looks too soft, add a few extra tablespoons of powdered sugar to stiffen it up.
One of my favorite versions adds a thin layer of seedless raspberry jam on top of the crust before the filling goes in.
It cuts the richness with some acidity.
That tartness really highlights the cream cheese in a way that surprises people.
Expert Tips for the Perfect Chilled Dessert Cups
Consistency is everything here.
Let me give you the exact checklist I run through during my meal prep.
These small things can make or break your dessert.
Room Temperature Ingredients Matter
This is non-negotiable.
The cream cheese and peanut butter need to be at room temperature.
If you try to mix cold cream cheese, you'll get lumps that are impossible to smooth out.
Take the cream cheese out of the fridge at least 60 minutes before you start.
If you forget, here’s a quick hack.
Cut the cream cheese into smaller cubes and microwave it on 10% power for about 15 seconds.
That softens it without melting it.
Don’t Overbeat the Cream Cheese
Its tempting to just walk away while the mixer runs.
But overbeating the cream cheese mixture can cause it to become runny.
That’s because too much air gets incorporated, which can break down the emulsion.
Beat just until smooth and fluffy.
That’s about two to three minutes total.
Press a Layer of Plastic Wrap on the Surface
Before you seal the cups with their lids, press a piece of plastic wrap directly onto the surface of the filling.
This prevents a skin from forming.
Nobody likes that weird, dry film on top of a dessert.
This is a professional technique I use all the time for chilled treats.
What to Do If Your Filling is Too Thick or Too Thin
Sometimes things go sideways.
Here’s my troubleshooting advice.
If your filling is too thick and stiff, it’s probably because you added too much powdered sugar.
Beat in a tablespoon of milk or heavy cream, one at a time, until it loosens up.
If your filling is too thin and runny, you might have overbeaten the mixture or your cream cheese was too warm.
Pop the mixture into the freezer for 15 minutes.
Your cream cheese peanut butter no bake mini dessert cups chilled treats mixture will firm up enough to pipe properly.
How to Store These Chilled Dessert Cups
If they last that long in your house, you’re going to want to store these properly.
Keep them in the fridge, covered.
They stay fresh for about four to five days.
I find the crust gets a bit softer over time, but the flavor is still awesome.
You can also freeze them without the topping.
Wrap each cup tightly in plastic wrap, then in foil.
They freeze well for up to a month.
To eat from frozen, just pop it in the fridge overnight to thaw.
The texture remains largely the same.
Actually, I often make a double batch and freeze half for unexpected guests.
It takes no extra effort during prep, but you get a dessert on demand later.
Perfect Portion Ideas for Serving
These mini cups are perfect for serving because they are already portion-controlled.
But what do you serve with them?
I usually keep it simple.
A sprinkle of crushed peanuts on top right after adding the whipped cream.
Or, if you want to feel extra fancy, some chocolate shavings.
You can also put them in the freezer for 20 minutes before serving if you like them a bit firmer.
Sometimes I even make a really quick chocolate ganache with two tablespoons of melted chocolate and one tablespoon of cream, then drizzle that over the top.
It’s a delightful, uncomplicated finish.
Frequently Asked Questions
Can I use a different type of cup for this no bake peanut butter dessert?
Yes, absolutely. I use mason jars because they are easy to seal. But small glass bowls, espresso cups, or even paper shot glasses work great. If you use paper cups, just peel them away before serving, and you get a cute little dome of dessert. However, if you plan to freeze them, stick to glass or rigid plastic containers. They maintain their structure better.
How do I know when the cream cheese peanut butter no bake dessert cups are fully set?
Give them the shake test. Take one cup and gently shake it side to side. If the filling jiggles as a single solid mass, it’s ready. If it sloshes around or seems liquidy, give it more fridge time. The surface should be firm to the touch. They need at least 4 hours, but I personally find that the results are best after a full night in the refrigerator. The key is patience during this chilled treats process.
Why did my peanut butter cream cheese dessert cups turn out gritty?
This usually happens for one of two reasons. First, if you use aged or low-fat cream cheese, it can develop a strange texture after mixing. Second, if you rush the process and don't let the powdered sugar dissolve completely, it will leave a gritty sensation on your tongue. Make sure you’re beating for long enough. If the mixture looks too dry, add a little bit of cream to help dissolve the sugars. This took me a few attempts to figure out, but now I always beat the sugar in until the filling is silky smooth.
My Final Thoughts on These Chilled Treats
There’s a certain comfort in knowing you can create such an elegant dessert in such a short time.
These cream cheese peanut butter no bake mini dessert cups chilled treats really have become a staple in my rotation.
They look stunning on the table, taste like something from a fancy cafe, and are forgiving enough for even a novice cook.
The process is simple enough to do with kids, too.
Let them crush the crackers and spoon the filling into the cups.
The individual portions mean less mess and no fussy cutting.
I love that I don't have to turn on the oven, especially in the middle of summer.
But even in the winter months, I still reach for this recipe because it feels nostalgic.
I always make a double batch now.
One batch for the event, one batch for me to snack on during the week.
Try this one out.
Honestly, this is one of those recipes that makes you look like a kitchen hero without the stress.
The rich chocolate and nutty notes pair beautifully with the lightly whipped layers.
The creamy taste of the peanut butter and cream cheese, mixed with the crunch of the crust, creates the perfect bite.
It provides a wonderful contrast in every single mouthful.
Let me know if you make these.
It’s always nice to hear how your version turns out.
The best part is watching people’s eyes light up when they take that first bite.
⚠️ Warning: This cake is high in sugar and fat. People with high blood sugar, diabetes, or nut allergies should consume it with caution. Always check your peanut butter labels for cross-contamination if needed.





