 bluename
 I have lost count of how many times I have tried to bake the perfect brownie chocolate cookie. The kind where the center stays soft and fudgy, but the edges get that nice chewy bite. Honestly, it took me a solid year of weekend experiments to get it right. A lot of batches came out either too cakey or just flat and dry. But after tweaking ingredient temperatures, chill times, and baking curves, I finally nailed a method that works every single time. So if you have been searching for how to bake brownie chocolate cookies fudgy center chewy outer cookie edges, I am going to walk you through my exact process.
I will share the precise mixing order, the resting time that matters more than you think, and the oven tricks that create that beautiful cracked top. I will also explain why melted chocolate beats cocoa powder here, and how a simple ice cream scoop can save your sanity. No fluff, no overly complicated steps. Just the stuff I wish someone had told me when I started.
Let us get into it.
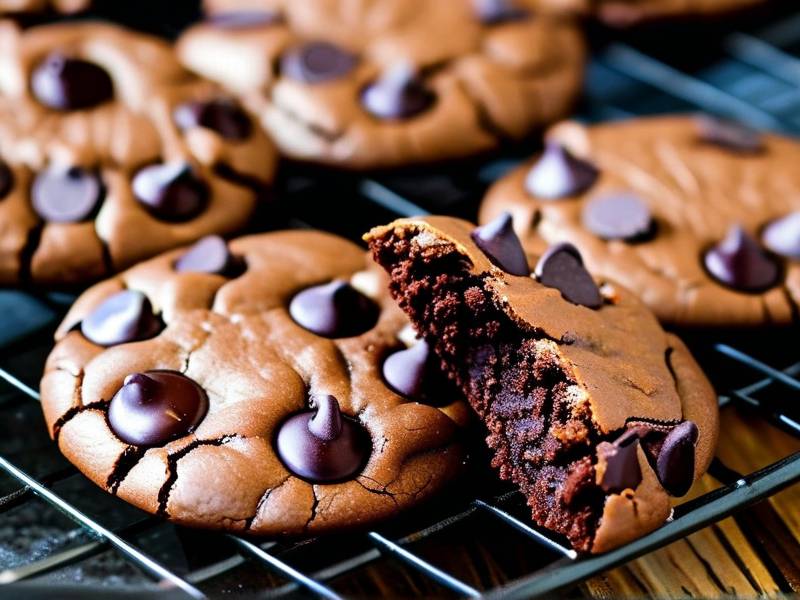
The Real Secret Behind Fudgy Centers and Chewy Edges
Before we touch a single bowl, we need to talk about what actually creates that texture contrast. I used to think it was all about baking time. I was wrong. The biggest factor, by far, is the moisture content in the dough and how it interacts with heat.
A fudgy center depends on a lower flour-to-fat ratio. Too much flour and you get cake. Too little structure and you get a puddle. The chewy edge, on the other hand, comes from sugar caramelization at the rim of the cookie. When the edges get thinner, they heat up faster and the sugars brown quicker. That creates that slightly crisp, chewy ring we all love.
Here is the catch though. If your dough is too wet, the edges will spread too thin and burn before the center sets. If your dough is too dry, the center will bake through and you lose the fudge factor. So the trick is balancing the wet ingredients and controlling dough temperature.
Many people skip the chilling step because they are impatient. I get it. I was one of them. But chilling the dough for at least 30 minutes is non-negotiable in my kitchen. That rest allows the flour to fully hydrate, which means less gluten development later. Less gluten means a softer, denser crumb. It also solidifies the butter, which slows down spreading during baking. Slower spread means thicker cookies and a better contrast between the middle and the edge.
I also learned that using both melted chocolate and a small amount of cocoa powder gives the best depth. The melted chocolate contributes to that gooey interior, while the cocoa powder reinforces the chocolate flavor without adding extra liquid.
Ingredients That Actually Matter
When you are learning how to bake brownie chocolate cookies fudgy center chewy outer cookie edges, the ingredient list is pretty simple. But the quality and temperature of each ingredient can change everything.
First, use real butter. Not margarine, not spread. Unsalted butter is my go-to because I control the salt level. Melt it gently on the stove or in the microwave, then let it cool slightly. Hot melted butter can scramble your eggs if you mix too fast. That is a mistake I have made. It is not fun.
Second, brown sugar. Lots of recipes call for a mix of white and brown. I use mostly brown sugar. The molasses in brown sugar adds moisture and that slight toffee flavor that makes the edges chewy. White sugar gives crispness, but brown sugar gives chew. I use about 75% brown and 25% white.
Third, chocolate. I prefer a dark chocolate bar with 60-70% cocoa, chopped roughly. Chips work, sure, but chips are formulated to hold their shape. Chopped chocolate melts in pockets, which gives you those fudgy pools inside the cookie. Honestly, the texture difference is big.
Fourth, eggs. Room temperature eggs blend into melted butter much easier. Cold eggs can seize the butter, leaving you with a lumpy mess. I take my eggs out of the fridge about 30 minutes before I start.
And finally, a sprinkle of flaky sea salt on top before baking. It might sound strange, but salt enhances the chocolate flavor and balances the sweetness. I use Maldon salt, but any flaky salt works.
The Step-by-Step Mixing Method
Let me walk you through my exact mixing order, because order matters more than most recipes admit.
First, whisk the melted butter with both sugars in a large bowl. I whisk by hand here, no mixer needed. The mixture should look glossy and smooth. It will take about two minutes of steady whisking. You want the sugar to start dissolving into the butter a little. That helps with the shiny crust later.
Then, add the room temperature egg and one extra egg yolk. The extra yolk adds richness and fat, which boosts the fudgy factor. Mix well until the batter looks homogeneous and slightly thick.
Add the vanilla extract at this point too. That little hint of flavor rounds out the chocolate.
In a separate bowl, sift the flour, cocoa powder, baking soda, and salt together. Do not skip the sifting. Cocoa powder clumps easily and no one wants a dry pocket of cocoa in their bite.
Add the dry ingredients to the wet mixture. Fold gently with a spatula until just a few streaks of flour remain. Then stop. Overmixing develops gluten, which makes the cookie tough. I let the dough look a little shaggy right before I fold in the chocolate chunks.
Finally, fold in the chopped chocolate. Do not overdo it. Fold until the chocolate is evenly distributed.
Now, cover the bowl and refrigerate. I chill my dough for at least 30 minutes, but 2 hours is even better. The dough will be easier to scoop and the cookies will bake up thicker. I have tested 10 minutes versus 2 hours, and the difference in texture is substantial.
Scooping and Shaping the Dough for Even Baking
When the dough is chilled, it is time to portion it out. I use a medium cookie scoop, about 1.5 tablespoons. That size bakes evenly without the edges burning before the middle sets.
Place the dough balls about 2 inches apart on a baking sheet lined with parchment paper. I roll each ball slightly in my palms to make it round, but I do not flatten it. The taller the dough ball, the thicker the center will be. This is a simple trick for how to bake brownie chocolate cookies fudgy center chewy outer cookie edges without buying any special equipment.
Here is the thing though. If you want that bakery-style look with the wrinkly, cracked top, you need to break the surface tension of the dough balls. I press a few extra chocolate chunks on top of each ball before baking. That also guides where the cracks form.
Do not overcrowd the sheet. I bake 6 cookies per standard sheet tray. If you put too many on one pan, the heat circulates poorly and the edges might not crisp up evenly.
If you are baking in batches, keep the rest of the dough in the fridge between rounds. Cold dough bakes better. Room temperature dough spreads too much and you lose that tall, fudgy middle.
Baking Time and Oven Temperature Tricks
This is where I see most people go wrong. They just pop the tray in a preheated oven and hope for the best. But you need to pay attention to two things: the actual oven temperature and the baking time.
My oven runs hot, so I set it to 350°F instead of the usual 375°F. But I always recommend using an oven thermometer. Many ovens are off by 25 degrees or more. That makes a huge difference to texture. If the oven is too hot, the edges burn before the center has a chance to set.
Here is my baking schedule. Bake the cookies for 10 to 12 minutes. At 10 minutes, the edges look set and slightly golden, but the centers will look a little underdone and puffy. That is exactly what you want. The cookies are still soft when they come out. Leave them on the hot baking sheet for 5 minutes. The residual heat continues to bake the bottom without drying out the center.
After 5 minutes, transfer the cookies to a wire rack to cool completely. If you move them too soon, they will fall apart. I know it is tempting. I have been there. But patience here pays off.
One important trick is to slightly underbake. The center of the cookie will still look a bit shiny when you pull the tray out. That shine means the interior is still a bit molten. As it cools, it will set into a fudgy texture, not a raw one. So do not panic and put it back in the oven.
The Chill Factor and Why It Creates Texture
I already said chilling matters, but let me expand on that a bit. When you chill the dough, the butter hardens. Butter that stays solid longer during baking melts slower. That slow melt allows the cookie to hold its shape longer, so the center stays thicker and softer. Meanwhile, the sugar at the edges starts to caramelize and crisp up. That is the chewy outer edge you want.
A quick 15-minute chill gives you a flatter, spread-out cookie with a less pronounced texture contrast. A longer chill, like 2 hours or overnight, gives you a taller, denser cookie with a clearer boundary between center and edge. I frequently make the dough in the evening, chill it overnight, and bake the next day. The flavor also deepens because the ingredients have more time to mingle.
This is a crucial part of how to bake brownie chocolate cookies fudgy center chewy outer cookie edges. If you want that signature contrast, the dough needs to be properly firm when it hits the oven.
Common Mistakes People Make
Let me run through a few mistakes that always cause trouble. I have made each of these errors myself, so trust me when I say they are worth avoiding.
First, overmixing the batter. I know we covered this, but it is worth repeating. The more you stir, the more gluten forms. Gluten gives you bread, not fudgy cookies. Mix until the flour just disappears and no further.
Second, baking on a dark metal pan. Dark pans absorb more heat, which can burn the bottoms while the top is still pale. I prefer light-colored aluminum pans with parchment paper. If you only have a dark pan, lower the oven temperature by 25 degrees and check earlier.
Third, skipping the rest period after baking. That residual heat finish is what sets the structure. If you yank them off the tray immediately, they crack or deflate. Let them rest on the hot tray for a few minutes.
Fourth, using low-quality chocolate. If you use chocolate with a low cocoa butter content, it will not melt as smoothly. The texture will feel waxy, not fudgy. Spend a little more on good chocolate. It really is worth it.
Fifth, making smaller cookies than the recipe expects. If you portion the dough too small, they will bake through in the middle and you lose the fudge. Stick to the 1.5 tablespoon scoop size.
How to Store Them So the Texture Lasts
Freshly baked cookies are amazing, but if you have leftovers, you need to store them correctly. Otherwise, they turn into biscuits.
Store the cookies in an airtight container at room temperature for up to 3 days. The center will soften a bit more as they sit, but they still taste great. If you want to revive the chewiness, pop them in a 300°F oven for about 3 minutes. That re-crisps the edges while softening the middle.
You can also freeze the baked cookies for up to 2 months. Just wrap them individually in plastic wrap and stick them in a freezer bag. When you want one, thaw at room temperature for 30 minutes or microwave for 15 seconds. They will lose a tiny bit of the crisp edge, but the fudgy center survives beautifully.
Also, the raw dough freezes incredibly well. I roll the dough into balls, freeze them on a tray, then transfer to a bag. When I want fresh cookies, I bake them straight from frozen. Just add 2 minutes to the baking time. That is one of my favorite meal prep hacks for a midweek dessert.
Shopping List and Ingredient Substitutions
If you are missing an egg or out of butter, you can make some swaps, but honestly, I have to tell you the original recipe is best. Still, let me give you a few substitutes that do not ruin the cookies.
For the butter, use a high-quality margarine in a pinch. The texture changes a little, but it still works. However, use a block-style margarine, not the spreadable kind in a tub. The spreadable type has extra water, which ruins the dough texture.
If you are avoiding eggs, use a flax egg. Mix one tablespoon of ground flaxseed with three tablespoons of warm water and let it sit for 5 minutes. It works, but the cookie will be a bit less rich. The center will be less fudgy, more cake-like.
For a gluten-free option, swap the all-purpose flour with a 1:1 gluten-free flour blend. I have tested this with the King Arthur brand and it works fine. Just keep the chilling time longer, because gluten-free flours can be more delicate.
You can also adjust the sweetness if it feels too much for you. Cut the white sugar down to two tablespoons instead of three. The brown sugar stays the same, because it is essential for the chew.
A Few Extra Tips for Perfect Presentation
If you are making these for a party or a bake sale, you want them to look as good as they taste. Here is my advice.
Right before serving, sprinkle a little flaky salt and a tiny dust of powdered sugar over the tops. That makes them look bakery-grade. It also adds a nice flavor contrast.
Serve them slightly warm with a scoop of vanilla ice cream on the side. The warm, fudgy center plus cold ice cream is one of my favorite desserts. The chewy edges hold up under the ice cream, so nothing gets soggy.
If you are stacking them for a gift box, place a piece of parchment paper between each layer. They are soft and might stick otherwise. Honestly, I have ruined a gift box or two by not doing this.
Frequently Asked Questions
Can I skip the chilling step if I am short on time? You can, but the cookies will spread more and the fudgy center may not survive. Even a 15-minute chill helps. The full 2-hour chill gives you that tall, thick center and crisp edges. If you have the time, do not skip it.
Why do my cookies turn out cakey instead of fudgy? Cakey cookies usually come from too much flour or overmixing. Make sure you spoon the flour into your measuring cup and level it off. Do not scoop directly with the cup, because you pack in extra flour. Also, mix only until the flour disappears.
When I use this brownie chocolate cookies fudgy center chewy outer cookie edges recipe, how do I know when they are done? Look at the edges. They should be lightly golden. The centers should look slightly puffed and a little shiny. Pull them out at that exact moment. The residual heat finishes the job.
Can I double this how to bake brownie chocolate cookies fudgy center chewy outer cookie edges recipe? Yes. Double all ingredients and split the dough into two bowls for chilling if needed. The baking time stays the same, but you will have to bake in more batches.
How long do these cookies stay fresh? At room temperature, they hold up for 3 days in an airtight container. In the fridge, they keep for about a week, but the texture gets firmer. Reheat in a low oven to bring back the fudgy feel.
Final Thoughts
Learning to bake brownie chocolate cookies fudgy center chewy outer cookie edges really comes down to three things. One, use the right ratio of ingredients. Two, chill the dough long enough. Three, pull them out of the oven before they look completely done. Once you master those three points, you will have a reliable recipe for life.
I still experiment with add-ins like pecans or a little espresso powder to deepen the chocolate flavor. But the base recipe here is the one I come back to every time. It is simple, consistent, and honestly, better than most bakery cookies I have tried.
So preheat that oven, chill that dough, and give yourself a little time. Your kitchen will smell amazing, and your cookies will have that gorgeous fudgy center and chewy edge that everyone raves about.
⚠️ Warning: This recipe is high in sugar and fat. People with high blood sugar, diabetes, or other metabolic conditions should consume it with caution. If you have dietary restrictions, consider reducing the sugar or consult a medical professional before eating.





