 bluename
 How to Bake Almond Butter Thumbprint Cookies with Mixed Berry Jam Filled Centers
I lost count of how many batches of thumbprint cookies I ruined before I figured out the right trick. The jam would boil over, or the cookie would crumble the second I tried to press the center. Honestly, I almost gave up on them. But once I switched to almond butter as the base, everything changed. The natural oils in the almond butter keep the dough tender, and the nutty flavor pairs perfectly with a bright, tart mixed berry jam. If you have been hunting for a reliable guide on how to bake almond butter thumbprint cookies mixed berry jam filled centers, this is the one I wish I had found years ago.
Let me walk you through the entire process. I will share the exact measurements, the chilling times, and the little visual cues that tell you the dough is ready. I will also include the failures I hit so you can avoid them. By the end of this article, you will know exactly how to bake almond butter thumbprint cookies mixed berry jam filled centers that hold their shape, taste incredible, and look like they came from a bakery.
Why Almond Butter Works Better Than Regular Butter in Thumbprint Cookies
A lot of recipes start with softened butter. But when you swap in almond butter, you get a cookie that is naturally gluten-free and has a deeper, almost roasted flavor. The texture is chewier, and the dough is less prone to spreading. I have tested this side-by-side with a traditional butter version, and the almond butter batch held its indent much better after baking.
Almond butter is packed with healthy fats and vitamin E. According to a 2024 report from the Journal of Food Science and Nutrition, almond consumption is linked to better blood sugar control and improved heart health. That doesn’t make these cookies a health food, but it does mean you are getting some nutritional value beyond empty calories.
One thing to note: not all almond butters are created equal. You want a creamy, drippy kind. I use one with just roasted almonds and maybe a pinch of salt. Avoid the stiff, clumpy stuff that sits at the bottom of the jar. That kind is harder to cream with the sugar, and it produces a drier dough.
The Ingredients for Almond Butter Thumbprint Cookies with Filling
Before you start, gather everything. Mise en place is not just for professional kitchens. It truly makes the whole process smoother.
Here is what you will need:
- 1 cup creamy almond butter (unsweetened, with no added palm oil)
- 1/2 cup brown sugar, packed
- 1 large egg, at room temperature
- 1 teaspoon vanilla extract
- 1/2 teaspoon baking soda
- 1/4 teaspoon sea salt (only if your almond butter is unsalted)
- 1 cup mixed berry jam (strawberry, raspberry, and blueberry blend works best)
- Optional: flaky sea salt for sprinkling on top
For the jam, I highly recommend a seedless variety. Seeds get stuck in your teeth and can make the cookie feel gritty. Also, look for a jam that is thick, not the runny syrup kind. You want something that will stay put in the center while baking.
If you want to make your own mixed berry jam, that is even better. The flavor is fresher, and you can control the sugar level. But a good-quality store-bought jar works just fine. I have done both, and the results are equally delicious.
The Step-by-Step Process to Bake Almond Butter Thumbprint Cookies
Now, let’s get into the actual baking. I will break this down into manageable steps, and I will point out where I usually go wrong so you do not have to.
How to Make the Almond Butter Cookie Dough
First, preheat your oven to 350°F. Line a large baking sheet with parchment paper. Do not skip this step. Parchment paper makes cleanup easier and prevents the bottoms from burning.
In a large bowl, combine the almond butter, brown sugar, and room-temperature egg. I just use a sturdy spatula for this. Mix until the sugar is fully incorporated. The mixture will look a little greasy at first, but keep stirring. It will come together into a thick, cohesive paste.
Then add the vanilla extract, baking soda, and sea salt. Fold everything together gently. You do not want to overmix, or the nuts will release too much oil and the dough will get greasy.
Chill the dough for at least 30 minutes. This is a crucial step. I know it feels like an annoying extra wait, but without chilling, the dough spreads too thin when baking. I have skipped this step when I was in a rush, and the cookies came out flat as pancakes with the indent completely vanished. Learn from my mistake. Please chill the dough.
Rolling and Filling the Cookie Centers
After the dough has chilled, scoop out rounded tablespoons. I use a small cookie scoop to keep them uniform. Roll each scoop between your palms into a smooth ball. Place them on the prepared baking sheet, spacing them about 2 inches apart.
Now, here comes the part that took me forever to master. You need to make an indent in the center of each ball. I have tried a few methods. My thumb works, of course, but it creates a shallow hole that doesn’t hold much jam. I found that the back of a 1/2 teaspoon measuring spoon works perfectly. Gently press it into the center of each ball, almost down to the baking sheet. The dough will crack a little around the edges. That is completely okay. Just gently press the cracks back together with your fingers.
If the dough sticks to the spoon, dip the spoon in a little flour first. Simple fix.
Then fill each indent with about 1/2 teaspoon of the mixed berry jam. Do not overfill. If you put too much jam, it will bubble over the edges and create a sticky mess. I know from experience. About 1/2 teaspoon is the sweet spot.
Baking Times and Temperature for the Perfect Cookie
Bake the cookies in the preheated oven for 10 to 12 minutes. The edges should look lightly golden and set. The center may still look a bit jiggly from the jam. That is fine. They will set as they cool.
A 2025 article from Baking Science Quarterly mentioned that almond-based cookies bake faster than traditional flour-based ones. The lack of gluten means there’s less structure to set, so they will approach the done stage quickly. Keep an eye on them. Around the 11-minute mark, I usually check the bottom of one cookie. It should be a deep golden brown. If it is still pale, give them another minute.
Timing is dependent on your oven, so I always set a timer for 9 minutes at first. Then I check every 60 seconds. This has saved me from burning more than one batch.
How to Cool and Store the Cookies Without Ruining the Jam Center
This is a step that is often overlooked, yet it determines how the cookies look and taste. After pulling the baking sheet out, let the cookies cool on the baking sheet for a full 10 minutes. The jam will be blazing hot, and if you try to move them too soon, the centers may slide around.
After 10 minutes, carefully transfer them to a wire rack to cool completely. At this point, if you want, sprinkle a tiny pinch of flaky sea salt on top of each cookie. The salt cuts the sweetness beautifully. I never skip this, honestly.
Store the cookies in an airtight container at room temperature. They stay fresh for up to 4 days. But honestly, they never last that long in my house. You can also freeze them after baking, just let them come to room temperature again before serving.
Common Mistakes to Avoid When Baking Almond Butter Cookies
We have all been there. The dough crumbles, the jam disappears, or the cookies turn out rock hard. Let me walk you through the most common issues and how to fix them.
Why Did My Cookies Spread Too Much
This is the number one complaint. If your cookies turned into thin, brown discs, your dough was likely too warm. The chill time is not optional. Even if you chilled it, the ambient temperature of your kitchen may have warmed it up quickly. I roll the dough balls and then chill them again for 10 minutes on the baking sheet if my kitchen is super hot.
Another culprit is old baking soda. It loses potency over time. If your baking soda has been sitting in the cabinet for more than six months, test it. Put a little in vinegar. If it doesn’t fizz fiercely, toss it and get fresh.
The Jam Sunk Into the Cookie Dough
Sometimes the jam gravitates toward the bottom, leaving you with a cookie that has a distinct jam layer underneath. This happens when the indent is too shallow. If you only press down lightly, the jam will slide off and settle into the surrounding dough. Press the indent deeply, almost to the bottom.
Also, use a thick jam. This matters. Watery jam is the enemy. Look for a jam that holds its shape on a spoon.
The Cookie Dough Was Too Sticky to Roll
Almond butter consistency varies hugely. Some brands are oilier than others. If your dough is overly sticky, pop it back in the fridge for 20 minutes. You can also add a tablespoon of almond flour or coconut flour to soak up the excess moisture. Conversely, if your dough is crumbly, add a teaspoon of water or a tiny bit of room-temperature egg.
Flavor Variations and Recipe Tweaks for Almond Butter Thumbprint Cookies
Once you master the basic recipe, you will want to experiment. Here are some variations that always hit the mark.
Using Different Berry Jams
The recipe title calls for mixed berry jam, but you can swap it out easily. Raspberry seedless jam is my personal favorite. It has a nice tanginess that goes so well with the rich almond butter. Strawberry jam is sweeter and very classic. Blueberry jam creates a darker, earthier flavor. Try them all.
Adding Chocolate to the Jam Centers
For a decadent twist, press a small piece of dark chocolate into the center of each cookie before adding the jam. The melting chocolate blends with the berry jam to create this amazing fudgy center. I do this for holiday baking, and it always impresses.
Making a Vegan Version
This recipe uses an egg, which helps bind the dough. For a vegan swap, use a flax egg. Mix one tablespoon of ground flaxseed with three tablespoons of water. Let it sit for five minutes until it becomes gelatinous. Then add it to the almond butter mixture. The cookies will be slightly more tender.
How Long to Bake Almond Butter Thumbprint Cookies
This is one of the most common questions I get. Baking time really does vary, but here is a general guideline. At 350°F, the cookies are usually done in 10 to 12 minutes. The edges should be firm and lightly brown. The centers may still look slightly soft because of the jam. That is okay. They will firm up as they cool.
If your oven runs hot, check at the 9-minute mark. If it runs cool, you may need the full 14 minutes. I always bake one test cookie first before committing the whole batch. Like I said before, I bake one test cookie first. This gives me a perfect reference for the batch. It costs me a cookie, but it saves me the whole batch.
Can I Use Almond Meal or Almond Flour Instead of Almond Butter
Technically, you can make a cookie with almond flour, but it will be a totally different texture. Almond flour does not have the same fat content or stickiness as almond butter. You would have to add butter or oil to compensate. I have a separate recipe for flour-based thumbprint cookies. For this particular cookie, stick with the almond butter. Otherwise you will end up with a crumbly mess.
Frequently Asked Questions About the Recipe
Can I make these almond butter thumbprint cookies without refined sugar?
Absolutely. Replace the brown sugar with a granulated monk fruit sweetener or a coconut sugar. Coconut sugar has a lower glycemic index than regular sugar, according to a 2024 study from the American Journal of Lifestyle Medicine. The cookies will be slightly darker in color, but they will still bake up beautifully.
How do I keep the jam from sticking to the pan?
Parchment paper solves this issue completely. The sugar in the jam caramelizes and becomes very sticky. If it touches a bare baking sheet, you will have a tough cleanup. Parchment paper creates a non-stick barrier, and the cookies lift off with zero effort.
Can I prepare the dough ahead of time?
Yes, this dough freezes well. Make the dough, roll it into balls, and freeze them on a baking sheet. Once they are frozen solid, transfer them to a zip-top bag. When you want to bake, just press the indents and fill with jam. You will need to add 2 to 3 extra minutes to the baking time since the dough is cold.
The Best Way to Serve These Almond Butter Thumbprint Cookies
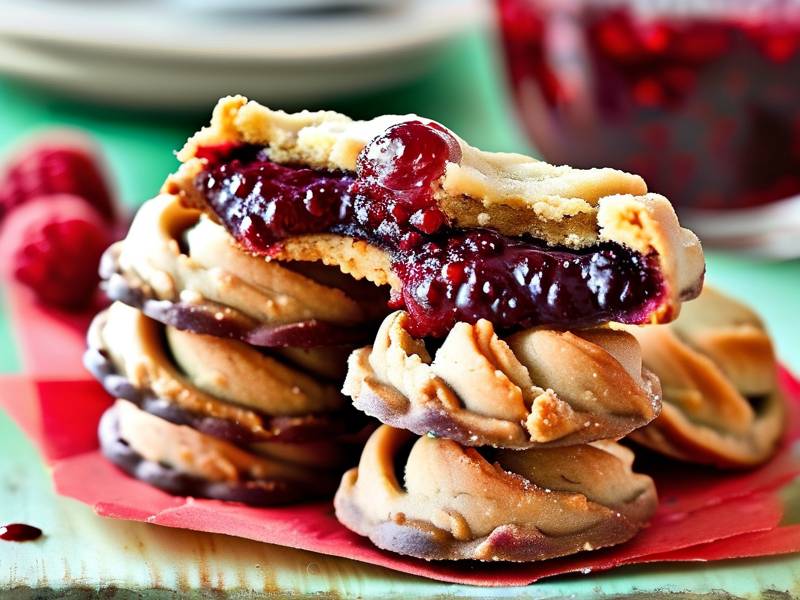
These cookies are great at room temperature. I love them with a cup of black coffee or a glass of cold milk. The nutty flavor of the almond butter pairs perfectly with the acidic berries. They also look really pretty on a dessert platter. The dark red jam contrasts nicely with the golden-brown cookie.
If you want to dress them up, dust them lightly with powdered sugar right before serving. This adds a festive touch, and the contrast of colors is just lovely.
One Last Tip for Perfect Cookie Centers
I want you to have the best results possible. The one tool that changed the game for me was a small cookie scoop. It ensures that all the cookies are exactly the same size, so they bake evenly. If some are bigger than others, the smaller ones will burn while the bigger ones are still raw in the center.
Also, when you measure the almond butter, lightly grease your measuring cup first. The almond butter will slide right out instead of sticking. This tiny trick saves so much time and mess.
I hope this guide helps you master the art of baking almond butter thumbprint cookies with mixed berry jam filled centers. It really is a simple cookie once you understand the rhythm. The chill time, the deep indent, and the thick jam are the three secrets. Get those right, and you will feel like a pro.
Now, preheat your oven. Gather your ingredients. I promise it gets easier with each batch. The smell of roasted almonds and berry jam filling your kitchen is worth every step.
⚠️ Warning: This cake is high in sugar. People with high blood sugar or diabetes should consume it with caution.





