 bluename
 How to Apply Crumb Coat Lock Loose Crumbs Before Final Smooth Frosting Layer: A Baker’s Step-by-Step Guide
I can’t tell you how many cakes I ruined before I figured this out. You spend hours baking, cooling, and stacking a beautiful layer cake. Then you slap on that final coat of frosting, and suddenly it looks like a construction site. Crumbs everywhere. Little gray specks ruining your smooth, pristine surface. It’s heartbreaking. Honestly, I nearly gave up on fancy cakes altogether. Then I learned the secret. Master how to apply crumb coat lock loose crumbs before final smooth frosting layer, and everything changes. It’s not just a technique; it’s the foundation of professional-looking bakes.
Let me walk you through my exact process. I’ve tested this method on dozens of cakes, from light sponges to dense chocolate fudge. It works. Here’s the real-deal approach using my own experience, some solid technique tweaks, and the reasons why locking crumbs early saves your sanity later.
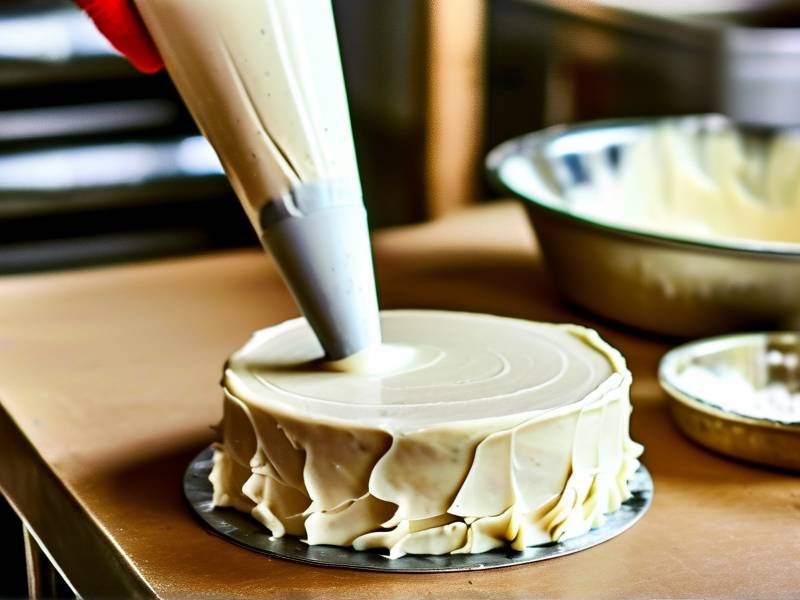
Why the Crumb Coat is the Unsung Hero of Cake Decorating
So, what’s the deal with the crumb coat? Simple. It’s a thin layer of frosting applied to the entire cake before the final, thicker layer. Its sole job is to trap loose crumbs against the cake’s surface. Think of it as primer for your cake. Just like primer smooths and seals a wall so paint goes on perfectly, a crumb coat seals the cake so your final frosting layer glides on cleanly without picking up any debris. Many beginners skip this step. I did. And every single time, I ended up with a speckled mess. The crumb coat is not optional if you want that clean, bakery-style finish. It completely changes your frosting experience. It locks everything in place, giving you a flawless canvas to work on.
It’s crucial to understand that this isn't about using a special frosting recipe. It’s a technique. Any buttercream works, though a slightly more liquid American buttercream is easier for the initial coat. The key is to get in there, cover every exposed cake surface, and chill it hard. That’s it. That’s how to apply crumb coat lock loose crumbs before final smooth frosting layer, but the timing and angle matter too.
Prepping Your Cake and Workspace for a Flawless Outcome
Before we even touch the frosting, we need a stable setup. Frosting a wobbly cake is a recipe for disaster. I learned that the hard way with a sliding cake on a lazy Susan that just wouldn’t stop spinning. Frustrating doesn’t even begin to cover it. So, here’s my simple prep checklist. This small step ensures success.
Ensure a Level and Chilled Cake Base First, make sure your cake layers are completely cool. I cannot stress this enough. A warm cake will melt your frosting instantly. Then, use a serrated knife to level off the domed tops. No one wants a lopsided finished product. After that, I pop the layers in the freezer for about 15-20 minutes. A chilled cake is firmer and produces way fewer crumbs when you start spreading frosting. Think about it logically: cold cake crusts are harder and less likely to shed those annoying particles. It's a game changer.
Set Up Your Turntable and Tools Get your turntable, if you have one, set up on a non-slip mat. If you don't have a turntable, a cake stand works, but it’s trickier. I highly recommend investing in a cheap one. It’s worth it. For tools, you’ll want a large offset spatula and a bench scraper. The offset spatula helps you apply the frosting, and the bench scraper is essential for getting that perfectly smooth outer edge. And, I like to place a dollop of frosting on the board under my cake base. That anchors the cake in place. No sliding around mid-spread. It saves so much time.
Mastering the Crumb Coat Technique: How to Apply Crumb Coat Lock Loose Crumbs Before Final Smooth Frosting Layer
Okay, let’s get to the main event. The technique itself. It’s all about intent. We’re not trying to make it beautiful yet. We’re just trying to seal. I find this to be the most freeing part of the decorating process, actually. There’s no pressure for perfection here. It’s just about covering. Here’s how I do it, step by step.
Step 1: Load Your Spatula with Generous Frosting You don’t want to be stingy here. Scoop a large amount of frosting onto your offset spatula. Place a big heap on top of the cake first. Use the spatula to push it outwards, covering the top surface. Don’t worry about even layers yet. The goal is coverage. Then, work your way down the sides, adding frosting from your spatula directly onto the sides. A thick, messy coating is perfectly fine. In fact, it’s better. You want a buffer layer.
Step 2: Spread with Quick, Even Strokes Now, get your bench scraper or a large spatula. Hold it vertically against the side of the cake. With your other hand, spin the turntable smoothly. The scraper will push the frosting around, filling in gaps and pushing crumbs into the frosting itself. See, the crumbs get trapped inside this initial layer. That’s the whole point. You will see streaks and crumbs. Don’t panic. That is exactly what is supposed to happen. Keep the scraper steady, and just try to create a somewhat even, rough layer all over. You’ll also want to smooth the top from the edge to the center. This helps create a sharp edge later.
Step 3: Seal and Chill Thoroughly Once the cake is fully covered, crumbs and all, you must refrigerate it. This is the most critical step. The crumb coat has to set and harden completely. That takes at least 30 minutes, but I always aim for a full hour. If you’re in a hurry, 15 minutes in the freezer works too. The goal is to get that layer firm to the touch. If you poke it gently, it should not leave a fingerprint. This firm base is what prevents you from pulling up stuck crumbs when you add the final layer. It works like a protective shell.
The Art of the Final Smooth Layer: Application Strategies
After the crumb coat is set, we finally get to the pretty part. Applying the final smoothing frosting layer is so much easier now. The surface is smooth and crumb-free, so the new frosting just glides. This is where you’ll feel your confidence soar. This layered approach is the core to how to apply crumb coat lock loose crumbs before final smooth frosting layer effectively and flawlessly.
Use a Clean Spatula and Fresh Frosting Don’t reuse the spatula from the crumb coat without cleaning it first. You don’t want to drag those old, locked crumbs back onto your clean surface. Get a fresh spatula and scoop out fresh frosting from your bowl. This frosting should be at room temperature and ideally whipped to be a bit softer for the final application. It should be silky smooth. This softer frosting is much easier to spread into a thin, even layer.
Apply a Generous Topcoat Just like before, start with a large amount of frosting on top. Spread it out over the top and down the sides. You want to have a slightly thicker layer than the crumb coat. Then, use your bench scraper to smooth it all out. The principle is the same. Spin the cake and hold the scraper steady. The difference is that now there are no crumbs to worry about. It’s just pure, smooth frosting. You might need to scrape off excess frosting from the scraper into a bowl as you go. Don’t put it back on the cake.
Perfecting the Edges for a Bakery Finish To get those sharp, perfect edges on top, hold the bench scraper at a slight angle as you work it from the edge toward the center. Don’t push it off the edge. You’ll see the top edge become defined. If you get too much frosting on the top, just scrape it off. Work with a light hand. If you press too hard, you’ll accidentally pull up the crumb coat underneath and expose crumbs again. This is where patience is key. Slow down. Breathe. It’s just frosting.
Troubleshooting Common Crumb Coat Mistakes Like a Pro
Even with the best technique, things can go wrong. But I’ve been there, and I have the solutions. Honestly, if you have a smooth process, the whole experience is much more enjoyable. Let’s talk about the common pitfalls. This advice will save you from throwing a spatula across the room, trust me.
Dealing with Stubborn Crumbs That Keep Appearing This usually happens when your cake isn't chilled enough, or the frosting is too thick. If you see crumbs appearing while applying the final coat, stop immediately. Put the cake back in the fridge for another 15 minutes. Don't try to fix it right away. You risk making it worse. Once it’s chilled again, use a clean spatula and very gently knock back the last little areas. A lot of times, this is just the cake testing your patience. It’s a natural hiccup in the process.
Fixing a Wobbly or Damaged Crumb Coat You might also find that your crumb coat is uneven or thin in spots. I've had this happen often with taller cakes. The solution is to patch it. Use some extra frosting to reinforce those thinner spots. Again, set it back in the fridge to firm up. Never apply the final layer to a weak crumb coat. It will collapse, and the crumbs will come loose. Remember, the crumb coat is the support structure. Treat it with respect. It is the silent hero.
Managing a Messy Workspace and Cleanup I always keep a bowl of hot water and a kitchen towel nearby. Dipping your bench scraper into hot water, drying it off, and then using it on the cake creates a much smoother surface. The heat slightly melts the frosting as it passes, giving you a flawless, almost glass-like finish. This is a trick I picked up from a pastry chef friend, and it works beautifully. It’s also way less mess. You just have to be quick. Don't let the water drip on the cake.
My Top Tools and Recipe Tweaks for Better Frosting
Let’s talk about tools and frosting consistency. The right tools can make a monumental difference in your success. Honestly, you don't need to buy out the store, but a few key pieces will change your life.
The Essential Toolkit – You absolutely need a sturdy turntable, a set of offset spatulas (both small and large), and a metal bench scraper. Skip the plastic ones; they bend too much. The metal ones glide better. I also always use a cake board that fits snuggly under my cake. It keeps the base clean and makes moving the cake easy. You can find all these at a good kitchen supply store or online. I use my turntable for everything now.
Finding the Perfect Buttercream Consistency For a crumb coat, you want your buttercream to be a bit looser. If it’s too stiff, it will pull at the cake and create more crumbs. You can easily fix stiff buttercream by mixing in a tablespoon or two of milk or heavy cream until it’s spreadable. For the final layer, it can be slightly thicker, but it should still be smooth and easy to manage. The ideal texture is like thick mayonnaise. I find that a classic American buttercream is forgiving and easy to make, making it perfect for beginners. A Swiss meringue buttercream is more stable, but that process is another story.
FAQ: Reader Questions on Applying a Crumb Coat
I get a lot of questions about this process. So let’s tackle the most common ones I see in my comments and messages. I love these questions because they mean we’re all learning together.
Q: Can I apply the final smooth frosting layer immediately after the crumb coat without chilling? A: Absolutely not. You really can’t. The crumb coat must be completely firm to the touch. It needs that time to set and lock those loose crumbs in place. Without a chill time, the final layer will just mix with the crumbs and create the exact mess you’re trying to avoid. The chilling step is non-negotiable in this technique.
Q: What if my crumb coat looks lumpy and messy? A: That’s totally fine. A messy crumb coat is expected. Its purpose is functionality, not beauty. You’re sealing in the cake with this initial frosting layer. What matters is that it's an even thickness and covers the entire cake. When the final layer goes on, it will hide all those imperfections. It’s just your undercoat. Don't stress about perfection here.
Q: Do I need a crumb coat if my cake is gluten-free or dense? A: In my experience, yes, you do. Dense cakes can be even more prone to crumbing. Gluten-free cakes are especially fragile and crumbly. The crumb coat is actually even more essential for them. It offers stability and a layer of protection that helps the denser, more delicate structure hold together during the final frosting. It’s like a tiny little cake gym holding it all together.
Final Thoughts on Mastering the Crumb Coat
Learning how to apply crumb coat lock loose crumbs before final smooth frosting layer took my baking from homemade to professional-looking. It was a genuine game-changer. It allowed me to decorate with confidence, without that constant feeling of fear that I was about to ruin everything. Every time I finish the crumb coat and see those crumbs locked away, I know the final product is going to be great.
I highly recommend you practice this on your next celebration cake. Even if you’re just making a simple afternoon treat, the difference is amazing. Once you see how smooth and clean your final layer looks, you’ll wonder how you ever baked before. I know I did. Don’t rush it. Let it chill. Be patient. Your reward will be a beautiful, crumb-free cake that looks like it came from a boutique bakery. Go make that perfect cake. I believe in you.
⚠️ Warning: This cake is high in sugar. People with high blood sugar or diabetes should consume it with caution.





