 bluename
 I’ve lost count of how many pie crusts I’ve rolled out over the years. And honestly, the ones that made me look like a hero weren’t the fussy lattice tops. They were the free-form galettes. If you’ve been searching for how to bake rustic fruit galettes free form open sweet pastry pies, you’ve come to the right place. This is the kind of baking that forgives a torn edge and celebrates a lopsided fold.
The first time I tried this, I was terrified the filling would leak everywhere. It did, a bit. But that burnt fruit juice on the parchment paper? It’s a feature, not a bug. That caramelized mess is what makes the crust taste like a bakery secret. So let’s get into the details, starting with the dough, because everything depends on that.
Before You Start, Sort Out Your Galette Dough and Chilling Time
Everyone asks me about the dough half of how to bake rustic fruit galettes free form open sweet pastry pies. It’s basically a shortcrust pastry, but we treat it differently. We don't overthink the shape. In fact, the more imperfect the circle, the more rustic it looks.
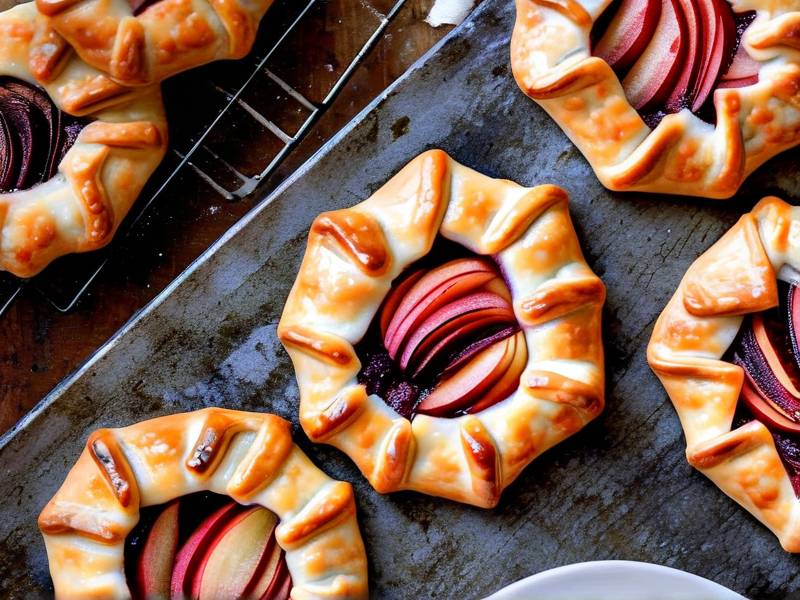
The crucial step here is keeping everything cold. I cannot stress that enough. Butter that warms up too much will make the dough tough. And we want flaky, tender layers, not a cracker.
Why Ice Water and Cold Butter Make or Break Your Pastry
Here’s the science part, but let’s keep it simple. When cold butter hits a hot oven, it releases steam. That steam pushes up the layers of flour, creating those beautiful, airy pockets. If the butter melts before the dough goes into the oven, you lose that lift. You get a dense, greasy crust instead.
I take my butter straight from the fridge and cut it into small cubes. Then I put those cubes back in the fridge while I measure my flour. It seems fussy, but contact with my warm hands melts butter fast. Use a pastry cutter or two forks if you don’t want to use your fingertips. You want pea-sized bits of butter visible in the flour mixture. That’s your target. Those little lumps of fat are what make the crust shatter.
Speaking of liquid, don’t dump all the water in at once. Start with half. Mix gently with a spatula. Add a little more only if the dough looks really dry. The moment it starts clumping together, stop. That’s enough. You can also swap one ice cube for a splash of apple cider vinegar. That acid relaxes the gluten, making the dough more forgiving.
How Long to Chill the Dough Before Rolling It Out
I recommend at least one hour. But two is better. This is the hardest part for impatient people like me. When I first tried baking galettes, I skipped the chill. The dough shrank when baking and lost all its shape. So don't skip it. Wrap the disc in plastic wrap and flatten it into a disk shape. It's easier to roll out a disk than a ball.
This resting period allows the flour to fully hydrate. It also stops the gluten from making the dough elastic. You want a pastry that holds its shape while baking, not one that snaps back when you roll it. After chilling, let it sit on the counter for 5 to 10 minutes before rolling. If it cracks, that's fine. Just pinch it back together.
Choosing the Perfect Fruit Filling for Your Rustic Galette
Now we get to the fun part. This is where you can use whatever fruit is sitting on your counter. I love stone fruits like peaches and plums. But berries and apples work just as well. The volume of filling depends on the size of your dough circle. A good rule is about 3 to 4 cups of sliced fruit.
Don't overcomplicate it with fancy sauces. The fruit's natural juice will mix with the sugar and thicken slightly in the oven. I usually add a tablespoon of cornstarch or tapioca flour to absorb excess liquid. That small addition makes the filling sticky and jammy instead of runny. If you're using super juicy berries, increase that thickener slightly.
Which Fruits Work Best for Open Face Pastry Pies
For berries: blueberries and raspberries hold up well. Strawberries are okay, but they release a lot of water. I usually quarter them and remove the cores. For stone fruits: peaches, nectarines, apricots and plums are fantastic. They soften beautifully and release just enough juice. For hard fruits: apples and pears work great, but I slice them thin so they cook through completely.
Mix and match flavors too. Peach and raspberry is a classic combo. So is strawberry and rhubarb. Trust your taste buds. If you think it would taste good as a jam, it will taste good in a galette. Cut large fruits into slices no thicker than 1/4 inch. This ensures even cooking.
How Much Sugar and Thickener to Use, Plus a Splash of Lemon
The sugar amount depends on your fruit. Sweet berries need less sugar. Tart apples need a bit more. I usually start with 1/4 cup of granulated sugar for 4 cups of fruit. If my fruit is really tart, I add an extra tablespoon. You can also use brown sugar for a deeper taste.
Cornstarch works, but I've grown fond of tapioca starch. It gives a clearer, glossier finish. Use about 1 to 2 tablespoons per 4 cups of fruit. Also, don’t forget the lemon juice. Half a lemon’s worth brightens everything up. It also helps the fruit hold its color. This small detail makes a big difference in the final look.
Step-by-Step Guide on How to Assemble a Free-Form Galette
Assembly is where the rustic charm comes in. This is the part of how to bake rustic fruit galettes free form open sweet pastry pies that people tend to overthink. But really, we are just putting fruit on dough and folding over the edges. That sounds too simple, but that's exactly what it is.
One tip: if your dough has been chilling in the fridge for more than an hour, let it sit at room temperature for a few minutes. If it's too cold, it cracks. If it's too warm, it sticks. Roll it out between two sheets of parchment paper. That saves a ton of mess and makes transferring the galette to a baking sheet much easier.
Rolling Out the Dough into a Rough Circle
Aim for a 12 to 14-inch diameter circle. The thickness should be about 1/8 of an inch. It helps if you rotate the dough a quarter turn between rolls. That way, you get a somewhat even circle. And don't worry if it isn't perfect. The whole point is the free-form look. I usually use a rolling pin, but a wine bottle works in a pinch.
If the edges crack, don't panic. Just press them back together with your fingers. Once you have your rough circle, transfer the whole parchment paper onto a baking sheet. This is way easier than moving the fragile dough alone. You can even keep the galette on the parchment to bake. That makes cleanup ridiculously easy.
Piling the Fruit Filling in the Center with a Border
Here’s a trick I learned from a French pastry chef. Leave a 2-inch border around the edges when you pile the fruit in the center. If you go all the way to the edge, the dough won’t seal properly. You’ll end up with a soggy mess.
Spread the fruit into an even layer. The pile can be tall, but don't overstuff it. Trust me, I've made that mistake. The fruit shrinks as it bakes, but the juice expands. If you pile it too high, you'll get a leaky galette. Use your hands to toss the fruit with the sugar mixture first. Doing it in the bowl avoids making a mess on your dough.
Folding the Edges Over the Filling, Pleating as You Go
Now for the fun part on how to assemble this rustic galette. Start at one spot and fold the dough edge over the side of the fruit. The dough will naturally create pleats. Just like folding a paper lantern.
Work your way around until all the edges are folded. Don't worry about making them uniform. Some areas might have more dough than others. That variety is what makes it look homemade. After folding, gently press the folds together to seal any cracks. Your galette will look a bit like a giant, open-faced pastry. That is exactly what you want.
The Best Oven Temperature and Baking Time for a Golden Crust
I bake my galettes at 375°F to 400°F (190°C to 200°C). The higher heat helps brown the crust while cooking the fruit fast. Baking is a balance. If the crust is brown too fast, the fruit may not be tender. If the temp is too low, the crust takes too long to crisp up. 400°F works well for me.
Baking time varies based on your fruit. Soft berries bake faster. Firmer apples and pears take longer. A rough benchmark is 35 to 45 minutes. The fruit should be bubbling in the center. The crust should be deep golden brown, and you should see caramelization juices around the edges.
Why an Egg Wash and Turbinado Sugar Are Non-Negotiable
Before baking, brush the folded crust with an egg wash. That’s one egg whisked with a tablespoon of water or milk. This gives the crust that beautiful glossy, golden sheen. Without it, the crust will look pale and feel a bit hard.
Then, sprinkle coarse sugar like turbinado (Sugar in the Raw) over the egg-washed crust. The hot oven melts the sugar just enough to create a crunchy shell. I also sprinkle a tiny bit over the fruit itself. The top of the fruit gets a lovely, sweet glaze. This small step elevates the whole dessert from rustic to bakery-level.
Letting the Galette Cool So the Filling Sets
The hardest part about baking is waiting. I get it. When your kitchen smells like butter and sugar, you just want to dig in. But if you cut too early, the filling will run out. The juices need time to gelatinize and set.
I let the galette cool on the baking sheet set on a wire rack for at least 20 minutes. If I’m feeling fancy, I wait 30. The bottom will still be warm. That’s perfect. Slice it while warm, but not right out of the oven.
My Personal History with Baking Rustic Fruit Galettes
I’ve been baking for over fifteen years. I started with pies and tarts. But I always had trouble getting a perfect crimped edge. My lattice tops always slid around. The turning point was reading an article in the 2024 issue of Fine Cooking that championed the "fold and pleat" method. It freed me from perfectionism.
I have since taught dozens of friends how to bake rustic fruit galettes free form open sweet pastry pies. Without exception, everyone has success. Because the dough recipe has a high fat-to-flour ratio, it bakes up tender even if overworked. My personal recipe uses 2 1/2 cups all-purpose flour, 2 sticks butter, and 1 teaspoon salt. It never fails.
Common Mistakes That Ruin a Galette (And How to Avoid Them)
One thing I see often is people not chilling the dough fully. That leads to excessive shrinking. Another issue is overfilling. I've done this far too many times to count. You think you're being generous, but the juice floods the pan. Then you have a smoky oven from all that charred sugar.
The solution is simple: resist the urge to overload. Stick to the 4-cup guideline. Also, slice your fruit evenly. If you have one fat wedge of apple and a thin slice of peach, they won’t cook at the same speed. Uneven baking turns the galette into a mushy mess. Take the time to keep your cuts consistent.
Recipe Adaptations: Gluten-Free and Whole Wheat Crusts
I often swap all-purpose flour for a gluten-free blend. Look for a 1:1 baking flour that contains xanthan gum. I find that the dough needs a slightly longer chill to hold together. Add an extra 2 tablespoons of water if it feels dry. The result is naturally just as crisp.
For a nuttier flavor, try replacing half the all-purpose flour with whole wheat pastry flour. Whole wheat has a lower protein level than regular whole wheat flour. This prevents the crust from becoming too tough. You also get a delicious toasty taste that pairs well with apple and pear galettes. It feels a bit healthier, but let's be honest—it’s still a butter pastry.
Frequently Asked Questions About Free-Form Fruit Galettes
If you still have questions about how to bake rustic fruit galettes free form open sweet pastry pies, I've got you covered. Here are three things I always hear from readers.
Can I Use Frozen Fruit If I Don't Have Fresh Fruit?
Yes, you can. If you use frozen berries or peaches, add an extra tablespoon of cornstarch to absorb the extra liquid. Do not thaw the fruit first. Throw it in frozen straight from the bag. If you thaw the fruit, it will release juice before baking. That will make your crust soggy. You also want to preheat the oven fully before putting the galette in. A hot oven helps the fruit cook faster, which minimizes juice leakage.
How Do I Store Leftover Galettes and Keep the Crust Crisp?
Store the cooled galette uncovered at room temperature for up to 24 hours. I keep mine on the counter, lightly tented with foil. But leave the sides exposed for airflow. Once you put it in the fridge, the moisture makes the crust soften. If you do refrigerate, reheat it in a 350°F oven for 10 minutes. That brings the crispness back. Avoid the microwave at all costs. It turns the pastry into a sad, rubbery thing.
Why Is My Galette Filling Runny or Watery After Baking?
Most likely, your fruit released too much moisture. Several things cause this. Maybe your fruit was overripe. Or you skipped the thickener. Or you didn't let it cool before slicing. The cornstarch needs heat and time to activate. Baking the galette until the juices are thick and bubbling at the center is crucial. If you pull it out of the oven while the jam is still watery, it won't thicken as it cools. It might set just a little, but it will remain loose.
Final Thoughts: A Rustic Fruit Galette Is the Perfect Weekend Baking Project
I hope this guide on how to bake rustic fruit galettes free form open sweet pastry pies has taken away the intimidating part of pastry baking. There’s something liberating about not needing a perfect shape. You can embrace the cracks and the folds. They are the beauty marks of the rustic style.
The next time you have peaches or berries that are a little too ripe to eat fresh, don't throw them away. Turn your oven on, make that butter dough, and fold up a galette. You’ll be surprised how quickly it disappears. Serve it warm with a scoop of vanilla ice cream or a dollop of whipped cream. A light dusting of powdered sugar before serving looks lovely too. And if it’s a weekday night? It still works. I’ve done it at 9 PM. No regrets.
⚠️ Warning: This cake is high in sugar. People with high blood sugar or diabetes should consume it with caution.





