 bluename
 Mastering the Art of Baking Ramekin Chocolate Lava Cakes with Perfectly Runny Molten Centers
There are few desserts more impressive yet deceptively simple as a chocolate lava cake. I still remember the first time I attempted them at home. The exterior looked flawless, but the center was a solid brick of baked chocolate. It was a real letdown after all the hype. Honestly, I have spent years testing different ratios of chocolate to butter, playing with oven temperatures, and even experimenting with different types of ramekins to tackle the tricky timing involved. It took some patience, but I finally nailed the method for achieving that glorious, liquid center every single time.
I’m sharing my complete, fail-proof guide on How to bake ramekin chocolate lava cakes with runny molten chocolate centers. This isn't a theoretical recipe; it is a collection of tried-and-true techniques born from my own kitchen. I will walk you through the specific ingredients that matter, the preparation steps you cannot skip, and the exact visual cues to look for. If you have ever wondered why your cakes bake fully through or, conversely, collapse into a puddle, this guide will solve those problems.
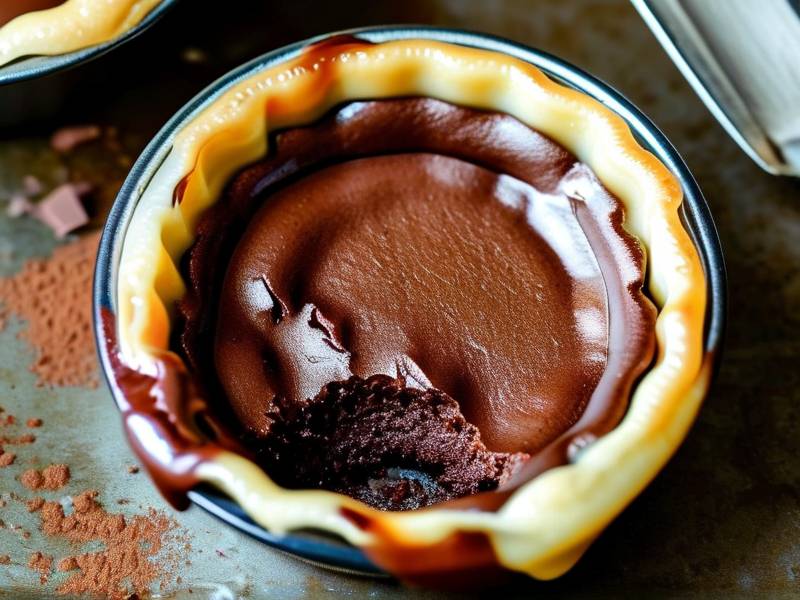
The Essential Science for Creating a Runny Molten Chocolate Center
The magic of a lava cake is all about the contrast between the firm cake structure and the fluid core. This isn't accidental. The concept revolves around baking a batter that is thick enough to set on the outside while the center remains underbaked. The key is the balance of fat and flour. The fat from butter and chocolate inhibits gluten development, and the egg yolks add richness. These elements work together to create a custard-like quality in the center. When you apply the right amount of heat, the edges cook through, but the interior barely reaches the temperature needed to solidify completely. This precise process is what creates the molten effect you see when you cut into the cake.
Conversely, baking the ramekins too long will cause the center to set. The residual heat continues to cook the cake even after you pull it from the oven. Therefore, you must account for that carryover cooking time. A vital part of the process involves chilling the filled ramekins before baking. This cold start gives the outer layers a head start on setting while the center remains cool and fluid. Many home bakers skip this, and it results in a cake that is molten all the way through and simply spills out like a puddle on the plate. I have found that using cold ramekins is the single biggest difference-maker for a consistently perfect center.
Selecting the Right Chocolate and Butter for the Ultimate Rich Flavor
The flavor of your cake heavily depends on the chocolate you choose. I strongly recommend using a high-quality chocolate bar, not chocolate chips. Chocolate chips contain stabilizers that help them retain their shape in cookies, but they often melt unevenly in a batter. Since this cake is predominantly chocolate, the flavor is front and center. I usually look for a dark chocolate with a cacao content between 60% and 70%. This range offers enough bitterness to balance the sweetness of the sugar, but it is not so dark that it tastes overly acidic.
As for the butter, I always use unsalted butter. This gives you total control over the salt content. I genuinely believe that a generous pinch of flaky sea salt mixed into the batter or sprinkled on top before baking enhances the chocolate flavor. The salt molecule excites the taste buds and cuts through the richness, making the chocolate taste more chocolatey. You want a rough 1:1 ratio of chocolate to butter for the richest center. For example, if you use 4 ounces of chocolate, use 4 ounces of butter. This ratio is the golden standard I have come to rely on for the perfect mouthfeel. The fat creates a soft, luxurious crumb that melts instantly.
The Importance of Eggs and Sugar in Your Lava Cake Batter
Eggs are the structural backbone of any cake, but here they play a special role. You will need both egg yolks and whole eggs. The yolks add richness and fat, while the whites provide some structure. My usual recipe calls for two large eggs and two large egg yolks. Beating them with the sugar until pale ribbons form is an essential step. This is where you incorporate air. In a lava cake, we are not relying on chemical leaveners like baking powder. The lift comes entirely from the air whipped into the eggs.
You have to beat them until they look like a thick, light yellow batter. When you lift the whisk, the batter should fall back into the bowl like a ribbon and leave a trail for a second. This is called the "ribbon stage". Because these cakes will not stay in the oven long, they need all the extra lift they can get to puff up and create that dome. Furthermore, the sugar is not just for sweetness. It lowers the freezing point and also helps with the color and crust formation on the outside of the cake when it hits the hot oven. I usually beat this mixture for a solid 3-4 minutes by hand to ensure it is thick enough.
How to Bake Ramekin Chocolate Lava Cakes: A Simple Step-by-Step Guide to Achieving a Runny Molten Center
Now we get to the heart of the process. To truly understand How to bake ramekin chocolate lava cakes with runny molten chocolate centers, you need a clear set of instructions. My approach is minimalist, and I have refined it over dozens of batches. The recipe bakes in a quick 12 to 14 minutes. The most important thing is to prepare everything in advance. Once the batter hits the ramekins, the oven should already be preheated, and your plates should be ready. Timing is everything in desserts like this one.
This method works beautifully for virtually any oven type, though you may need to shave a minute off the baking time if you are using a convection oven. Let’s break down the process into actionable, easy-to-follow steps. Below, I have outlined the exact procedure I use.
Mixing the Batter: Step-by-Step Instructions for a Smooth Consistency
The process all starts with a water bath. I bring a small pot of water to a simmer and place a heatproof bowl over it. The bowl should not touch the water. This is the safest way to melt the chocolate without scorching it. I break the chocolate and butter into the bowl and let them melt slowly, stirring occasionally. Once it is smooth, I set it aside to let it cool down a little. If the chocolate is too hot, it will scramble the eggs when you combine them. So, I let it sit for about five minutes while I whisk the eggs.
In a separate large mixing bowl, I combine the whole eggs, the egg yolks, the instant coffee powder (a secret ingredient I use to intensify the chocolate flavor), and the sugar. I use a hand mixer on high speed to beat this mixture until it is foamy and pale. This takes about 3 minutes. Then, I slowly pour the warm chocolate mixture into the egg mixture. Instead of dumping it all at once, I pour it in a thin stream while the mixer is running on low. This evenly distributes the heat.
Next, I fold in the all-purpose flour. I add it gently with a rubber spatula. You do not want to overmix the batter once the flour is in. Overmixing will develop gluten, which will make the cake tough and chewy rather than moist and tender. You just want to fold until you see no more streaks of white flour. The batter at this point will be quite runny and glossy. It will look like a thick pudding.
To Chill or Not to Chill: Preparing Your Ramekins for the Oven
This is the crucial step that separates a perfect lava cake from a cookie. I take the four ramekins and grease them heavily with butter. I use my fingers to smear the butter all over the bottom and the sides. Then, I sprinkle some cocoa powder inside. I tap the ramekins to coat the butter with the cocoa. The cocoa powder helps the cake easily release from the sides as it climbs when baking. It acts as a non-stick barrier and adds a slightly bitter note to the exterior, which is quite pleasant. Some recipes call for flour, but cocoa powder works much better for a chocolate cake.
Now, I divide the batter equally among the ramekins. Each should be about 3/4 full. This gives the cake room to rise and puff up over the top. Then comes the chilling. I place the filled ramekins into the refrigerator for at least 30 minutes. If I have time, I let them go for an hour. This cold shock is vital. It ensures the sides cook faster than the center. The chilled batter allows the exterior to begin setting and clinging to the ramekin, creating a pocket for the molten chocolate to hide in. This also proves that you can prepare the batter ahead of time and bake them just before dessert.
Baking Times and Temperature: How to Get a Cake that is Cooked on the Outside and Gooey on the Inside
When I am ready to bake, I preheat my oven to 425°F (220°C). A hot oven is non-negotiable. The high heat causes the edges to bake very quickly. While the oven is heating, I take the ramekins out of the fridge and let them sit on the counter for a few minutes to take the extreme chill off, though they should still be cold.
The baking time is precise. I usually start checking at exactly 8 minutes. My oven tends to run a bit hot, so my window is between 10 and 12 minutes. For smaller ramekins, 10 minutes is usually perfect. For larger ramekins, you might need 13 minutes. You will know they are ready when the top looks set and looks like a small cake dome. The edges will look completely baked and have pulled away slightly from the sides of the ramekin.
You have to be brave here. If the cake looks wobbly, it is not ready. If it looks too hard, you have probably gone over by a minute. The center should jiggle very slightly when you give the ramekin a gentle shake. A friend of mine described it as looking like the cake is wobbling like a jelly, but the structure around it is firm. That is the precise moment to pull it out. The residual heat will finish the job. Because the batter is cold, the center will stay liquid even after you remove it.
The Right Way to Rest and Unmold the Cakes
Resting the cake is almost as important as baking it. I know it is tempting to flip them immediately, but you have to be patient. Once the ramekins are out of the oven, I place them on a wire rack and set a timer for exactly 1 minute. This gives the cake time to soothe. The exterior starts to firm up and contract slightly away from the ramekin sides. If you try to invert it immediately, the cake is too fragile and will break apart.
After that minute, I place a plate on top of the ramekin. I then carefully flip the whole thing over. I use my hands to hold the plate and ramekin together securely. I give it a gentle shake side to side for a few seconds. You will feel the cake release and drop slightly onto the plate. Then, I lift the ramekin vertically up. If it is stuck, I just shake it a little more. Most of the time, it falls out perfectly onto the plate.
Occasionally, you might see a small piece stick to the ramekin. That just means you didn’t grease it thoroughly. For the best presentation, I like to let the cake rest for another 30 seconds after unmolding. The molten center needs this time to settle. If you cut into it immediately, the chocolate will flow out too aggressively and create a huge mess. Letting it rest helps the sauce pool elegantly around the base of the cake rather than exploding across the plate.
Classic Pairings and How to Serve Molten Ramekin Chocolate Lava Cakes Best
Once you have mastered How to bake ramekin chocolate lava cakes with runny molten chocolate centers, you will want to present them beautifully. Serving them with a high-quality vanilla ice cream is the classic choice. The cold, creamy texture of the ice cream against the warm, rich cake is purely magical. I always place a scoop of the ice cream on top of the cake at the table. The heat of the cake begins to melt the ice cream, creating a fantastic sauce.
Another one of my favorite ways to serve them is with a dollop of lightly sweetened Chantilly cream. If you want something with a bit of a kick, a spoonful of raspberry sauce or a few fresh berries cuts through the dense chocolate richness perfectly. The acidity in the berries balances the sweetness. I also love to dust the tops with confectioners’ sugar right before serving. I find that it makes the cake look professional. Just put a little in a sieve and tap it over the plates. It adds a hint of elegance and extra sweetness.
Troubleshooting Common Lava Cake Problems: Hard Centers, Runny Batters, and Sticking Ramekins
There are very common problems that pop up when baking these desserts, and I have encountered all of them. The biggest issue is a solid center. This usually means the cakes were baked too long or the oven was too cool. The lower temperature cooks the inside thoroughly before the outside can form a crust. Furthermore, if your ramekins are too thin, they conduct heat more rapidly, causing the center to cook. I recommend using ceramic ramekins that are roughly 6 to 8 ounces in volume for the best oven performance.
The opposite problem is ending up with a runny batter that spills out flat. This happens when the cakes are underbaked or if you skipped chilling them. The batter is too thin to hold any shape. Also, try adding a bit more structure by ensuring your eggs are beaten to the ribbon stage. If your cake sticks to the ramekin, I promise it is simply a lack of fat. You must be generous with the butter and the cocoa powder. Do not just spray with cooking spray; use the real melted butter technique involves rubbing solid butter all over the surface.
FAQ: Your Most Frequent Questions About Baking Molten Chocolate Cakes
You likely still have a few questions, especially if you are new to this. I have collected some of the most common queries I get from my readers about this process. These are all questions I have asked myself over the years. Here are my direct, practical answers based on my experience.
Can I prepare the ramekins ahead of time for a dinner party?
Yes, absolutely. You can prepare the batter and fill your greased ramekins completely. Then, I simply cover each ramekin with plastic wrap and store them in the refrigerator. I have kept them for up to 24 hours before baking. This is actually one of the best ways to ensure a runny molten center. The cold batter is essential. Just let them sit at room temperature for 15 minutes before baking to take the chill off, though you should keep them cold to the touch before they go in the oven.
What is the best way to store and reheat leftover lava cakes?
Honestly, these cakes are best consumed fresh from the oven. However, if you have leftovers, you can store them baked in the fridge. The molten center will solidify. To reheat them, I place the ramekin in the microwave for about 15 to 20 seconds. This will not give you the runny center you had, but it will be a warm, soft chocolate cake. Alternatively, you can leave them in the ramekins and bake them frozen for a few extra minutes if you want to have them later in the week.
My oven does not have a conventional setting. Is a convection oven okay?
Yes. What temperature for baking lava cakes in a convection oven is different? I recommend reducing the temperature by 25°F. If the recipe calls for 425°F, set your convection oven to 400°F. The convection fan circulates hot air more effectively, so the external cake cooks even faster. You will need to adjust the baking time down by roughly 2 to 3 minutes. I would start checking the cakes at the 7-minute mark to prevent overcooking.
⚠️ Warning: This cake is high in sugar. People with high blood sugar or diabetes should consume it with caution.
The key to nailing this dessert is confidence and preparation. I remember my friend telling me that the first time they baked them, the chocolate ran all over the plate because they used silicone molds, which don't hold heat the same way. Stick to the ramekins. Ensure the butter and chocolate are adequately mixed and your egg mixture is fluffy. Whether you are baking this for a romantic dinner, a dinner party, or just a craving on a rainy Tuesday, the result is worth it.
Do not stress too much about the timing. The first few times you try How to bake ramekin chocolate lava cakes with runny molten chocolate centers, you might have some misses. It happened to me. That’s okay. Learn how your oven behaves. Check the cakes early and often. Follow the visual clues I gave you. Trust the process. Practice is the key to getting that perfect molten center. Once you see that chocolate spill out onto the plate, all the trial and error becomes completely worth it. I guarantee you will feel an incredible sense of achievement for a dessert that looks so gourmet but is so easy to master.





