 bluename
 I still remember the first time I attempted to make vanilla bean pastry cream from scratch. I was probably 19, standing in my tiny apartment kitchen, staring at a pot of scalded milk like it was a science experiment. The recipe looked simple enough on paper. But then came the eggs, the sugar, the constant whisking, and that terrifying moment when the mixture suddenly thickens and you have to decide if it is done or if you just made sweet scrambled eggs. I have made hundreds of batches since then. And honestly, the process of learning how to make vanilla bean pastry cream fill classic choux pastry cream puffs completely changed the way I think about pastry. It is not just about following a recipe. It is about understanding texture, timing, and temperature. In this guide, I want to walk you through every single step, including the mistakes I made so you do not have to repeat them.
Understanding the Core Components of a Perfect Choux Pastry Cream Puff
Before we dive into the actual process, let us take a step back. You might be wondering why some cream puffs taste amazing while others fall flat. The secret is not just the shell. It is the filling. A classic choux pastry cream puff relies on two distinct elements that have to meet in perfect harmony. The choux pastry itself needs to be light, airy, and crisp. The vanilla bean pastry cream needs to be rich, silky, and stable enough to hold its shape inside that delicate shell. I learned this lesson the hard way when I once filled my puffs with a cream that was too loose. Within ten minutes, the shells turned soggy and collapsed. That was a sad afternoon.
Why Vanilla Bean Makes a Difference in Your Pastry Cream
There is a reason why I specifically say vanilla bean and not vanilla extract. The tiny black specks in a vanilla bean do more than just add visual appeal. They carry a depth of flavor that liquid extract simply cannot replicate. Real vanilla beans contain over 200 aromatic compounds. When you scrape the seeds out of the pod and infuse them into hot milk, you get a floral, slightly smoky sweetness that lingers on your palate. I have done side-by-side tests in my own kitchen. Extract gives you a straightforward vanilla taste. The bean gives you complexity. If you are serious about learning how to make vanilla bean pastry cream fill classic choux pastry cream puffs, I strongly suggest you invest in good quality vanilla beans. They are not cheap, but the difference is unmistakable.
Essential Equipment and Ingredients Checklist
Let me give you a quick rundown of what you need before you start. For the pastry cream, you will need whole milk, granulated sugar, egg yolks, cornstarch, unsalted butter, and of course, a vanilla bean. Some recipes also use a pinch of salt to balance the sweetness. For the choux pastry, you need water, milk, unsalted butter, flour, eggs, and a small amount of sugar and salt. In terms of equipment, keep things simple. A heavy-bottomed saucepan, a whisk, a rubber spatula, and a fine-mesh strainer are your best friends. You also need a piping bag with a round tip for both the choux and the cream filling. Honestly, I have tried using zip-top bags in a pinch. It works, but it is messy. A proper piping bag makes the process so much smoother.
| Equipment | Purpose | Difficulty Level |
|---|---|---|
| Heavy-bottomed saucepan | Even heat distribution for custard | Essential |
| Fine-mesh strainer | Straining lumps from pastry cream | Essential |
| Instant-read thermometer | Checking choux dough consistency | Recommended |
| Piping bag with round tip | Forming choux shells and filling | Essential |
| Baking sheet with parchment | Preventing sticking and even baking | Essential |
Step-by-Step Process to Make Vanilla Bean Pastry Cream from Scratch
Now we get to the heart of it. I am going to break down the pastry cream process into clear, manageable steps. Take your time with this. Rushing through the custard is the fastest way to end up with lumps or, worse, scrambled eggs.
Infusing the Milk with Vanilla Bean
The first thing I do is split the vanilla bean lengthwise with a sharp paring knife. You want to cut through one side only, keeping the other side intact so it opens like a book. Then, use the back of the knife to scrape out the tiny seeds. Do not throw the pod away. Put both the seeds and the empty pod into a saucepan with the milk. Heat this mixture over medium heat until it is just about to simmer. You will see small bubbles forming around the edges. This is your cue to turn off the heat and let the vanilla steep for about 15 minutes. The longer it sits, the more flavor you extract. I often do this step in the morning and come back to it later. That deep infusion really shows up in the final taste.
Tempering the Egg Yolks Without Scrambling Them
Here is where the fear kicks in for most beginners. While your milk is infusing, whisk together your egg yolks, sugar, and cornstarch in a separate bowl. The mixture will look thick and slightly pale. Once your milk is warm, you need to slowly add it to the egg mixture. The trick is to pour just a small stream of hot milk while whisking constantly. This raises the temperature of the eggs gradually, so they do not cook too fast. If you dump all the hot milk in at once, you will get sweet scrambled eggs. I have done it. It is not fun. After you add about half the milk, you can pour the rest in with more confidence. Then, return the entire mixture to the saucepan.
Cooking the Custard to the Right Consistency
Turn your heat to medium and start whisking. Do not stop. The mixture will look thin and milky at first. Then, after a few minutes, you will feel it start to thicken. It happens suddenly, so stay alert. You are looking for a texture similar to thick pudding. When the custard starts to bubble gently, let it cook for another minute or two. This step is crucial because the cornstarch needs to be fully cooked to eliminate any raw flour taste. Once it reaches the right thickness, remove it from the heat and stir in your butter. The butter adds shine and a silky mouthfeel. Then, strain the entire mixture through a fine-mesh strainer to catch any tiny lumps that formed.
Chilling the Pastry Cream Properly for Piping
Do not skip the straining step. I know it seems like an extra dish to wash, but it makes a real difference. After straining, press a piece of plastic wrap directly onto the surface of the cream. This prevents a skin from forming. Then, refrigerate for at least two hours, or ideally overnight. When you are ready to fill your choux pastry, give the cream a vigorous whisk to smooth it out. If it feels too stiff, you can fold in a little bit of whipped cream to lighten it. But keep in mind, the stiffer the cream, the better it holds its shape. For classic choux pastry cream puffs, you want stability over fluffiness.
Making Classic Choux Pastry Shells that Hold Their Shape
You cannot talk about how to make vanilla bean pastry cream fill classic choux pastry cream puffs without addressing the shell. Choux pastry, or pâte à choux, is a cooked dough that puffs up in the oven because of the high moisture content. It is actually easier than most people think, once you understand the two critical stages.
The Importance of Proper Dough Drying on the Stove
You start by bringing water, milk, butter, sugar, and salt to a rolling boil. Then, add all your flour at once and stir vigorously. The mixture will form a ball and pull away from the sides of the pan. Here is the key: keep stirring over low heat for another two or three minutes. You are drying out the dough. This removes excess moisture, which allows the pastry to puff properly in the oven. I used to skip this step and wonder why my shells came out flat. It took me a while to understand that moisture is both your friend and your enemy in choux pastry. You need enough moisture to create steam, but not so much that the structure collapses.
Adding Eggs the Right Way for a Silky Smooth Dough
Once your dough has cooled slightly, you add the eggs one at a time. This is a workout, honestly. Each egg needs to be fully incorporated before you add the next one. After the first egg, the dough will look curdled and separated. Do not panic. This is completely normal. Keep mixing, and after the second egg, you will see it come together into a smooth, glossy paste. The final consistency should be thick enough that when you lift your spatula, the dough falls off in a V shape. If it is too stiff, add a little beaten egg. If it is too loose, you overmixed. Finding that sweet spot takes practice. I genuinely believe it takes about three tries before you really feel confident.
Piping and Baking Techniques for Even Rise
When your dough is ready, transfer it to a piping bag fitted with a round tip. Pipe mounds onto a parchment-lined baking sheet. Each mound should be about the size of a golf ball. Wet your finger with water and gently press down any peaks. This creates a smooth surface. Then, bake at a high temperature, around 425°F, for the first 10 minutes. After that, reduce the oven to 375°F and continue baking until the shells are golden brown and feel light when you pick them up. Do not open the oven during the baking process. The sudden temperature change can cause the shells to deflate. I learned that lesson when I was checking on my puffs and they literally collapsed in front of me. It was heartbreaking.
Filling Techniques and Storage Tips for Cream Puffs
Once your shells are completely cool, it is time to fill them. I have tested various methods for this step, and honestly, some work better than others.
Three Reliable Ways to Fill Choux Pastry with Vanilla Pastry Cream
The first method is the classic injection. Use a small round piping tip to poke a hole in the bottom of each choux. Then, insert the tip and gently squeeze the cream until you feel resistance. The second method involves slicing the puffs in half horizontally and spooning or piping the cream onto the bottom half. Then, you place the top back on, like a mini sandwich. This method is messier but gives you a more artisanal look. The third method is my favorite for serving at parties. Use a Bismarck tip to inject the cream from the side. This keeps the top completely clean, which makes for a beautiful presentation. Whichever method you choose, make sure your pastry cream is well chilled and properly whisked before filling.
| Method | Best For | Visual Result |
|---|---|---|
| Bottom injection | Clean tops | Classic bakery look |
| Horizontal slicing | Home serving | Rustic and chunky |
| Side injection with Bismarck tip | Parties | Professional finish |
How to Store Filled Cream Puffs Without Losing Crispness
Here is something nobody tells you when you are learning how to make vanilla bean pastry cream fill classic choux pastry cream puffs. Filled cream puffs do not store well. The moisture from the cream slowly seeps into the shell, turning it soft. Ideally, you want to fill your puffs no more than two to three hours before serving. If you must prepare ahead, store the empty shells in an airtight container at room temperature for up to two days. Store the pastry cream separately in the fridge. Then, fill them fresh on the day you plan to serve. It is a bit more work, but the texture difference is worth the effort. No one likes a soggy cream puff, right?
Troubleshooting Common Mistakes and Frequently Asked Questions
Even after years of practice, I occasionally run into issues. And I want you to know that every problem has a solution. Let me walk you through some common pitfalls.
Fixing Lumpy or Thin Pastry Cream
If your pastry cream turns out lumpy, you likely did not whisk fast enough when you added the hot milk to the eggs. The good news is you can fix it. Simply strain the cooked cream through a fine-mesh sieve. This removes the lumps and leaves you with a smooth custard. If your cream is too thin, it probably did not cook long enough. The cornstarch needs to reach a full boil to activate its thickening power. Return the mixture to the heat and cook for another minute or two until it visibly thickens. This is one of those key steps in learning how to make vanilla bean pastry cream successfully. Be patient. Do not pull it off the heat too early.
Why Did My Choux Pastry Deflate in the Oven?
Deflated choux pastry is a classic frustration. There are actually a few reasons this happens. The most common culprit is underbaking. If the shells are not fully dried out, they will collapse when you pull them out of the oven. Another reason is the dough was too soft, which means you added too much egg. And finally, opening the oven door mid-bake is a guaranteed way to ruin your puffs. Steam needs to escape gradually. When you open the door, cold air rushes in and the steam condenses, causing the structure to fall. I know it is tempting to peek. But resist the urge. Your cream puffs will thank you.
Dairy-Free Modifications and Substitutions
A lot of people ask me if they can make this recipe without dairy. The short answer is yes, but with some adjustments. For the pastry cream, substitute the whole milk with full-fat oat milk or coconut milk. Both have enough fat to produce a creamy texture. Use a dairy-free butter substitute that is specifically formulated for baking. For the choux pastry, replace the butter with a plant-based alternative, but keep the water ratio the same. This is genuinely useful if you are exploring how to make vanilla bean pastry cream fill classic choux pastry cream puffs but need to accommodate dietary restrictions. Just know that the texture will be slightly different. The puffs might not rise quite as high, but they will still be delicious.
FAQ: Common Questions from Home Bakers
Question 1: Can I use vanilla extract instead of a vanilla bean in my pastry cream? Yes, you can, but the flavor profile will be simpler. Use about one tablespoon of pure vanilla extract for every bean. Add the extract after you finish cooking the cream so the heat does not evaporate the alcohol and flavor compounds.
Question 2: How far in advance can I make vanilla bean pastry cream? You can make the pastry cream up to three days in advance, as long as you store it properly in the refrigerator. Keep the plastic wrap pressed onto the surface to prevent a skin from forming. Whisk it well before using.
Question 3: What is the best way to get a smooth texture in my choux pastry dough? The key is to mix thoroughly after each egg addition until the dough becomes smooth and glossy. Use a spatula to smear the dough against the side of the bowl. This action helps break down any lumps and creates that silky smooth texture you are after.
Final Thoughts and Serving Inspiration
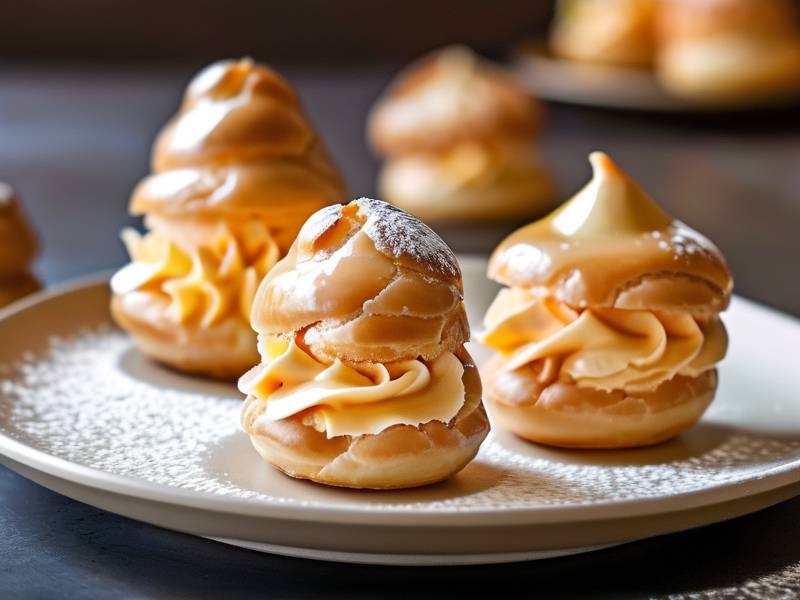
Look, at the end of the day, making these pastries is a labor of love. I am not going to sugarcoat it. It takes time, patience, and a willingness to make a few mistakes along the way. But the moment you cut into that crisp shell and see the smooth, fragrant vanilla bean pastry cream inside, you will realize it was all worth it. I hope this guide has given you the confidence to try making your own at home. Start with a small batch. Practice the techniques. Before you know it, you will have mastered the art of filling classic choux pastry cream puffs with your own homemade vanilla bean pastry cream. Serve them dusted with powdered sugar or dipped in chocolate ganache. Either way, they will be gone fast. I promise you that.
⚠️ Warning: This dessert is high in sugar. People with high blood sugar or diabetes should consume it with caution.





