 bluename
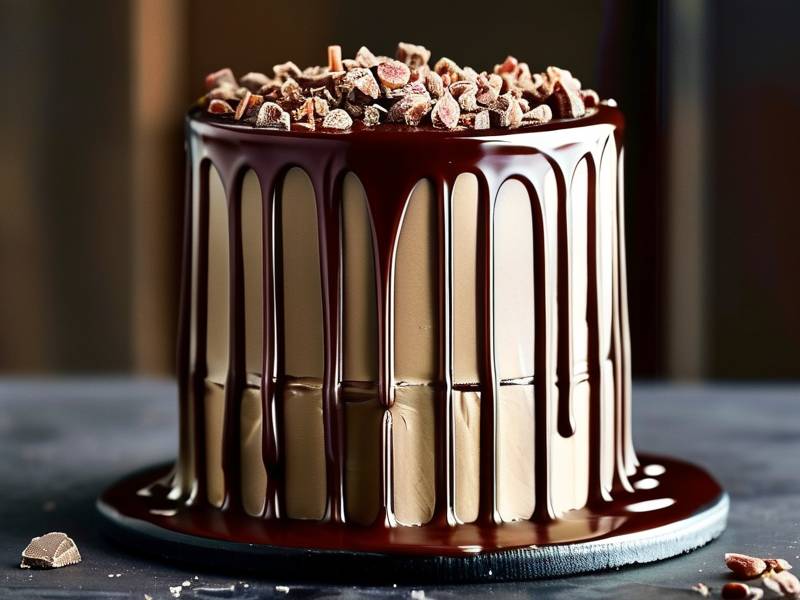
 The first time I tried to make a vertical drip on a cake, it was a disaster. I poured warm ganache over the top, and it just ran straight down to the board, leaving a huge puddle. It looked nothing like those elegant cakes you see in magazines. I learned pretty quickly that getting the right consistency isn’t about luck. It’s about understanding how dark chocolate, cream, and temperature interact with each other. In this guide, I’m going to break down exactly how to make dark chocolate ganache ideal viscosity vertical cake side drip without all the guesswork. I’ve tested these ratios more times than I can count, and I’m sharing everything that actually works.
Understanding the Core Ratio for a Vertical Drip
Before we even touch a saucepan, we need to talk numbers. The most common mistake I see is people using a 1:1 ratio of chocolate to cream. That’s fantastic for filling or truffles. But it’s way too thick for a drip. For a clean, controlled iced side drip, you want a specific range. I almost always use a 1.5:1 ratio of chocolate to cream. So, for example, 300 grams of dark chocolate to 200 grams of heavy cream. This gives you a mixture that flows, but it sets relatively quickly on the cold cake surface.
But here’s the thing. It’s not just about the weight. It’s about the fat content in your chocolate. Dark chocolate with 54% to 60% cacao solids behaves differently than a 70% bar. The higher the cacao percentage, the lower the sugar and the higher the cocoa butter. This affects how the ganache flows. If you use a 70% bar, you might need to add a touch more cream to get the same runny texture. Honestly, I stick to a good quality 54% semi-sweet for most of my drip work. It has the smooth mouthfeel and is forgiving for beginners.
Why Temperature Matters More Than You Think
You can have the perfect ratio, but if the temperature is off, it will fail. The ganache needs to be at a specific temperature range to flow perfectly down the side of a vertical cake. I take my cake straight from the fridge. It’s cold, so it has a firm buttercream. The goal is to have the ganache cool enough so it slightly thickens on contact, but is still warm enough to slide slowly.
The sweet spot for me is around 85°F to 90°F (29°C to 32°C). At this temperature, the consistency is like warm honey or heavy syrup. It will run down the side but not pool at the bottom. If it’s hotter, say 100°F, it will be too thin. It will race down the cake, taking your frosting with it. If it’s below 80°F, it might be too thick and will clump or leave a sloppy edge. Using a reliable instant-read thermometer is a game-changer. It takes the guesswork out entirely.
The Step-by-Step Process for Making the Ganache
Let’s get into the actual cooking process. I like to use finely chopped chocolate. Big chunks are a pain because they take forever to melt and might burn. Place the chopped chocolate in a glass bowl. Then, heat your heavy cream in a separate saucepan. You want it just at a simmer. Bubbles around the edge, but not a rolling boil. Overheating the cream can cause it to separate and make the ganache grainy.
Once the cream is hot, pour it over the chocolate. Now, the key is to let it sit. I wait about 2 minutes. This allows the heat to penetrate the chocolate chunks. Then, I take a silicone spatula and start mixing from the center in small circles. You want to slowly widen the circles to incorporate all the chocolate. You don’t want to whisk vigorously. That introduces air bubbles, which can ruin the smooth drip and leave holes in the finish.
Adjusting the Viscosity for the Perfect Flow
So, you mixed it all together and have a smooth mass. Now, let’s test the thickness. The spoon test is my go-to method. Dip a spoon into the ganache and lift it up. Watch how it falls off. A perfect drip consistency should fall off the spoon in a steady ribbon. It should look like thicker molasses. The ribbon should pile up on itself for a second before smoothing out.
If it's too thick, simply add a tiny bit of warm cream. I usually add, like, a teaspoon at a time and stir gently. You don’t want to shock it. If it’s too thin, wait a minute. Let it sit and cool slightly. The ganache will thicken as it cools. Alternatively, you can add a few more finely chopped pieces of chocolate and stir to melt them in. This is a great trick because it thickens the ganache without changing the flavor profile drastically.
Preparing the Cake for the Drip Application
You can’t just pour ganache on a naked cake and expect perfection. The texture of the buttercream is make-or-break. I always crumb coat the cake first and chill it hard. Then, I do a final coat of smooth buttercream. The crucial part is the exterior. If the buttercream is too soft and warm, the ganache will melt it and create a messy, streaky look.
I chill the frosted cake in the fridge for at least 20 minutes before attempting the drip. The buttercream should be firm to the touch. Honestly, I often leave it in there for 30 minutes. A firm base gives the ganache that icy-cold surface to lock onto. This is what sets up that instant "grip" and creates those beautiful tear-drop-like drips at the bottom. This is how to make dark chocolate ganache ideal viscosity vertical cake side drip work seamlessly.
The Perfect Temperature for the Time of Year
This is a little nuance I picked up over the years. The ambient temperature of your kitchen will change how the ganache behaves. If it’s a hot, humid summer day, your ganache will stay runny for longer. I actually let mine cool to the lower end of the temperature range, which is around 85°F, before I even pour it. In winter, when my kitchen is cooler, I might keep it closer to 90°F to ensure it doesn’t get too stiff before I’ve finished pouring around the whole cake.
Also, your touch matters. I use a squeeze bottle for precision. You have total control over the amount and the pressure. If you’re unsure, grab a small offset spatula and use the squeeze bottle to just nudge the ganache over the edge. This control is vital for a first-timer. You don’t want a giant cascade right off the bat. Start with smaller, controlled drips. You can always go back and add more for longer drips.
Step-by-Step: Applying the Drip to the Side
Alright, the moment we’ve been waiting for. I like to place my chilled cake on a turntable. This makes it so much easier to rotate and control the drip. Fill your squeeze bottle with the warm, tempered ganache. Start at the top edge of the cake. Apply gentle pressure and allow a small amount to run over the side. You want it to travel about halfway down, or for a specific look, maybe all the way down.
The trick is speed and consistency. I try to move with a steady hand. If I stop and start, the flow can be interrupted. I don’t worry about the top being messy yet. I focus entirely on the sides. Once I have a full loop around the cake with the drips, I go back to the top. I pour the remaining ganache onto the center and use a large offset spatula to spread it evenly to the edges. The drips will already be there, so the top layer will merge with them seamlessly.
Troubleshooting a Ganache That Runs Too Fast
Let’s say you pour it, and it immediately goes straight to the base. It looks like a waterfall. Don't panic. This happens to everyone. The ganache is too warm. It's simple to fix, but you need to act quickly. Wait a few minutes for the ganache in the bottle to cool down a bit. The bottle itself will lose heat quickly. Test it on the back of your hand. It should feel just slightly warm, not even hot.
If it’s still too fast, I just wait a couple more minutes. The cool air will thicken it. If the cake has already had a huge drip, you might need to scrape it off and start over. But usually, you can pour a thicker, cooler ganache over the top to mask the accidental waterfall. It’s not perfect, but it works in a pinch. Patience is your best friend here.
Troubleshooting a Ganache That’s Too Stiff
The opposite problem is when the ganache just plops over the edge and doesn't move. It creates a thick, ugly dollop. This is because the mixture is too cool or has too much chocolate. If it’s cooled down too much, you can gently re-heat it. Set the squeeze bottle in a bowl of warm water for a minute. Shake it up (with the cap on) to redistribute the heat. But never use the microwave on the plastic bottle.
If you need to truly fix the thickness, you have to add more hot cream. I’d take the ganache out of the bottle, add a very tiny splash of hot cream, and mix thoroughly. It’s better to do it in a bowl. This will re-liquify the chocolate. From there, you can let it come down to the correct temperature again. Don’t rush this step. Honestly, chilling it for a few minutes to bring the temperature down is often all it needs.
Tips for Achieving Even Vertical Drips
Even dripping is the hallmark of a professional-looking cake. It’s not hard, but it does require a bit of rhythm. I find that keeping the bottle close to the edge of the cake helps maintain control. If you hold it too high, gravity creates too much force. You’ll get a splatter. Keep the tip just a few millimeters away from the frosting.
Also, remember that viscosity changes as you go. The ganache in your bottle is constantly cooling. So, your first drip will always be slightly thinner than your last one. I try to work quickly but calmly. If I’m making a lot of drips, I sometimes need to squeeze the bottle to mix the warmer center with the cooler outer parts. This helps keep the temperature uniform.
Using Different Spout Sizes for Specific Looks
The diameter of your bottle tip drastically alters the drip size. A wide tip will give you a big, prominent drip. That looks very rustic and modern. A small, pointed tip gives you a delicate, skinny drip. That’s great for a more minimalist or elegant look. I have three different bottle sizes in my toolkit.
For a standard vertical drip, I use a medium tip. It’s about 1 centimeter in diameter. This gives a nice, balanced flow. You can also use a plastic piping bag with a hole snipped off. It works the same way. The key is to be consistent with the size you choose. Mixing a huge drip and a tiny drip on the same cake looks messy unless you’re going for that specific abstract vibe.
Recipe: The Base Ganache Used for Drip
Let me give you my go-to recipe. This is my baseline for a 6-inch or 8-inch cake. It’s based on that 1.5:1 ratio. I really recommend weighing your ingredients. Baking is science. It’s the only way to ensure you get the exact same result every time.
- 300g high-quality dark chocolate (54%-60% cacao)
- 200g heavy cream (36% to 40% milk fat)
- 1 tbsp light corn syrup (optional, but helps with shine)
The corn syrup is something I discovered recently. It adds a lovely glossy finish and helps prevent the ganache from becoming too brittle when it sets. It’s not a must, but I think it elevates the look. Heat the cream to a simmer, pour over the chocolate, and add the syrup. Let it sit and then whisk gently until smooth. That’s it.
Why Chocolate Quality Affects the Viscosity
The bloom on a chocolate bar is a big deal. When you buy cheap chocolate, it’s often overly sweet and may contain stabilizers. These additives can change the flow properties of your ganache. I’ve used grocery store baking chips before, and the drips were actually grainy. It was pretty terrible.
Using high-quality couverture chocolate—usually, one that’s high in cocoa butter—melts smoothly. It produces a silky ganache that has a beautiful fluidity. It also sets with a nice snap when cool. Trust me, the difference between a cheap chocolate bar and a professional brand is night and day. You’re paying for the texture and structure of the final drip.
Storing Leftover Ganache for Later
If you have extra ganache, don’t throw it out. You can store it in an airtight container in the fridge for up to a week. It will harden completely. To reuse it for another drip, you’ll need to re-melt it. I put it in a heatproof bowl over a pot of simmering water (a bain-marie). Heat it gently, stirring frequently.
However, note that re-melted ganache can sometimes be slightly less smooth. It may have a tendency to be a bit thicker. You might have to add a teaspoon of cream to get it back to that thin, gloss-like consistency. It’s a fantastic way to prep ahead for the weekend. Just be prepared to adjust it slightly.
The Role of Buttercream in the Drip Process
I touched on this, but I need to emphasize it. The buttercream temperature is integral to getting that optimal vertical drip. If the buttercream is too soft, the excess moisture from the ganache will melt it. You’ll get a dirty, brown edge where they mix. The ideal canvas is a chilled, firm buttercream that has a rigid structure.
This allows the ganache to flow over the top and hang in droplets. The cold surface rapidly reduces the temperature of the ganache on the outside. This is what stops the drip from sinking into the cake. The process of rapid cooling is what creates that clean edge between the frosting and the chocolate. This is the secret behind how to make dark chocolate ganache ideal viscosity vertical cake side drip on professional cakes.
Why a Crumb Coat is Non-Negotiable
I’ll be honest, I used to skip the crumb coat. I thought it was a waste of time. But I was wrong. A crumb coat creates a barrier. It seals in any loose crumbs. More importantly, it provides a perfectly smooth and even surface for your final coat. If your base layer has bumps, the drip will follow those bumps. It will look wonky.
The crumb coat also helps to harden the entire structure of the cake. With a double layer of cake and frosting, the cake is sturdier. This means it will move less when you are adding the heavy pressure of the squeeze bottle. A stable cake is the first step to a successful drip. It saves you so much frustration.
Using a Cold Glass Bowl vs. Plastic Bottles
A weird tip that I’ve found useful is testing the bottle temperature. Plastic doesn’t hold heat very well. It actually cools the ganache faster than glass. This can be a problem. If your bottle is cold, the ganache inside will thicken quicker. I always warm my squeeze bottle with hot water before filling it. I just swirl the hot water around and dump it out.
This simple step keeps the ganache at its fluid temperature longer. This gives me more time to work with it. The last thing you want is the ganache to thicken halfway through your pour. The flow will become inconsistent. A warm bottle prevents that. It’s a small detail, but it’s one of those professional secrets that everyone actually knows and uses.
The Science of Cocoa Butter and the Set
Let’s get nerdy for a second. The reason your ganache flows and then sets is because of the cocoa butter. Cocoa butter is a polymorphic fat. That means it can solidify in multiple crystal forms. When you melt it, it breaks down into a liquid. As it cools, it returns to a solid.
The rapid cooling against the cold cake helps create a stable crystal structure. This gives you a shiny, snappy finish. If the ganache cools too slowly, it can get a bluish or grayish tint (called fat bloom). This isn't dangerous, but it looks unappealing. To avoid this, I always ensure the cake is as cold as possible. The fast temperature change is your friend here.
Short Video: A Quick Visual Walkthrough
While I can’t embed a video here, I recommend searching for slow-motion videos of ganache being poured on a cold cake. It’s really mesmerizing. You’ll clearly see the flow rate and how it stops and clings to the side. Visuals are a great way to understand the flow. It helped me a lot when I was starting out.
The best way to learn is by doing, though. Even with all the theory, you’ll probably mess up your first few attempts. Don't worry. That's how I learned. Take notes on what you did. Write down the temperature, the brand of chocolate, and the consistency of the buttercream. You’ll start to see a pattern that works for you.
Adding Flavor Variations to the Ganache
You can easily change the flavor profile without ruining your consistency. Instead of using plain cream, you can steep it with ingredients. For example, if you want a coffee flavor, heat the cream with a tablespoon of espresso powder. You can also add vanilla bean paste or peppermint extract.
A note of caution: extracts often contain alcohol. Alcohol affects the viscosity. If you add too much, it can make the ganache too thin. Add it drop by drop. For a raspberry flavor, you’d want to use a seedless raspberry puree. But you need to adjust the cream ratio. If you add puree, you subtract the same amount of cream to keep the total liquid volume consistent.
Common Questions About the Drip Technique
Let me answer a few questions that I get all the time from my bakery customers and students. These are the pain points that almost everyone has. Addressing them honestly might save you a whole batch of ingredients and a big headache.
What Should I Do If The Ganache Slices Through the Cake?
This usually happens when the buttercream is too soft. It’s really a support issue. The heat from the ganache melts the fat in the buttercream. It then slices down into the cake layers. The best solution is prevention. Make sure that final coat of buttercream is rock hard in the freezer or fridge. A smaller drip that’s applied slower also exerts less weight and pressure on the top of the cake.
But if it’s too late, and you see a line forming, you can try to fix it by immediately chilling the cake. But honestly, it’s often easier to scrape the top layer of ganache off and re-apply. It’s a lesson in patience, for sure.
Can I Use Milk Chocolate for Drips?
Yes, absolutely. A milk chocolate ganache is a bit sweeter. But it also has a different fat content. Since milk chocolate has more milk solids, it can be a bit more viscous when melted. You might need to adjust your ratio. You often need a little less cream than with dark chocolate.
Generally, a 2:1 ratio of milk chocolate to cream is a good starting point. The key is to test it just like you would with dark chocolate. The look is lighter and creamier. It’s a bit less dramatic than dark chocolate, but it’s delicious on vanilla or caramel cakes. Honestly, milk chocolate is great for kids' birthday cakes.
Should the Ganache be Refrigerated After Setup?
Usually, my cakes are displayed for a few hours. If the room is cool, the cake can stay out. But if it's a hot environment, I always keep the cake in the fridge. A ganache drip actually helps protect the cake. It seals in moisture.
If the cake has been in the fridge for a while, the ganache will become very hard. That’s fine. But let the cake sit at room temperature for about 30 minutes before cutting. It allows the frosting and ganache to soften to a perfect sliceable texture. If it’s too hard, it will crack when you cut it.
Final Thoughts and My Personal Advice
I really hope this guide on how to make dark chocolate ganache ideal viscosity vertical cake side drip has given you the confidence to go try it. The most important takeaway is to be gentle. Gently heat the cream. Gently mix the chocolate. Gently squeeze the bottle.
Don't rush the process. It’s a performance of controlled movements. I still get a little thrill when I see that perfect drip fall slowly and stop right where I want it to. It takes time to get the "feel" for it, but once you do, you’ll be able to whip up a stunning drip cake in minutes.
Keep practicing. Keep your thermometer nearby. And don't forget to have fun. Even the messy ones taste good. If that buttercream is chocolate or vanilla, you can’t really go wrong. I’m confident you’ll get it to work. Trust the ratio, watch your temp, and you’ll nail it.
Frequently Asked Questions
Here are some more specific issues you might run into. I’ve broken these down into a simple Q&A format. They are the exact questions I receive in my workshop. I hope they help you.
How does the ambient room temperature affect my ganache preparation?
The viscosity is directly correlated to temperature. In a hot, humid kitchen, ganache stays warmer. This means it will flow faster and farther down the cake. You have to let it cool more here before application. In a cold kitchen, it thickens up much faster. You have to work quicker. I always recommend turning off any direct sunlight or heaters where you’re decorating. Consistency comes from controlling the environment.
If my ganache is too runny, is there a way to thicken it without ruining the color?
Yes, if you haven’t added it to the cake yet, you have options. If the ganache is too hot, just wait. If it’s the balance that’s wrong (too much cream), you’ll need to add more chocolate. Melt some extra chocolate separately and then fold it into your mixture. Make sure to cool the entire mixture down to the target 85°F-90°F range before testing again. It’s much better to thicken it slowly with solid chocolate than to cook it again.
What is the biggest secret to getting that tight, sharp edge at the bottom of the drip?
The sharp "drip-drop" edge is a classic look. The secret is having an extremely cold cake. The shock of the cold temperature is what makes the ganache quite literally freeze in its tracks. If the cake is soft, the ganache will lose its edge and create a blob. So, make sure your cake is cold, firm, and smooth. You want the contrast between the fluid ganache and the frozen frosting. That quick shock is the answer.
How quickly should the ganache run down the side?
The flow time is crucial. A good drip will usually slide down to about 2/3 of the way down the cake in about 10 to 15 seconds. Then, it stops or just barely crawls. If it reaches the bottom instantly, it’s too thin. If it takes a minute to move an inch, it’s too thick. Play with the temperature a bit until you get that 10-second total travel time. That's the sweet spot for me; it might vary slightly for you.
⚠️ Warning: This cake is high in sugar. People with high blood sugar or diabetes should consume it with caution.





