 bluename
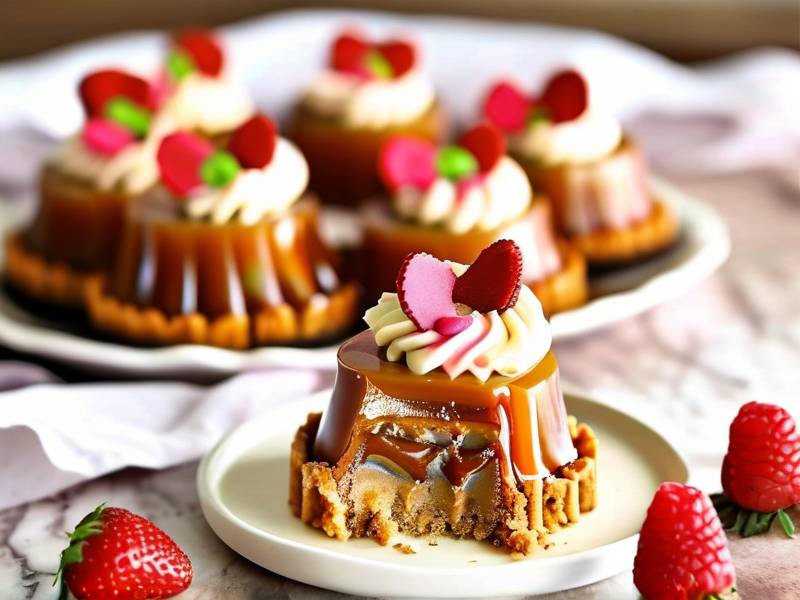
 Salted caramel drizzle is that one topping that turns a simple dessert into something you actually crave. I have made countless ice cream frosted cakes over the years, and honestly, the drizzle is the part people remember. This guide walks you through how to make salted caramel drizzle decorate ice cream frosted cake desserts, step by step, with the real kitchen mess included.
I still remember my first attempt at caramel. It looked like chunky mud, and I almost gave up. But after testing different ratios, temperatures, and timing, I found a method that works every single time. You will not need a candy thermometer if you trust your eyes and a cold water test. That is the trick I use at home, and it has never failed me since.
The goal here is simple. You want a silky caramel that pours beautifully over cold ice cream frosting and sets into a slightly chewy, salty-sweet ribbon. We will cover the sauce recipe, the frosting technique, the assembly order, and the exact way to drizzle without melting your hard work. Plus, I will share the mistakes I made so you can skip them.
What Makes Salted Caramel Drizzle the Best Topping for Ice Cream Frosted Cakes
Here is the thing about ice cream frosted cakes. They are cold, they are soft, and they melt fast at room temperature. So your topping needs to handle that reality. A thick, sticky salted caramel drizzle is perfect because it clings to the cold surface without sliding off immediately. That is why I prefer it over chocolate ganache or plain syrup.
Salted caramel also brings a flavor contrast that plain sweet frostings just do not have. The salt cuts through the richness of the buttercream or whipped cream, and it makes the vanilla ice cream taste even creamier. I learned this from a pastry chef friend who told me that salt is not a flavor, it is a flavor enhancer. He was right.
Another reason I love this combination is texture. When caramel hits a freezing cold cake, it hardens slightly. That gives you a delicate, crispy shell around each slice. Inside, the caramel stays soft and gooey. So every bite has three textures: crunchy shell, silky caramel, and cold creamy frosting. That complexity is what makes people ask for the recipe.
Many people worry that caramel will just run off the cake. But if you make the sauce thick enough and chill the cake properly first, it will stay put. I will show you the consistency you need, so you never deal with a pool of caramel at the bottom of your cake stand.
The Core Recipe for Salted Caramel Drizzle That Works on Cold Desserts
Before you even start mixing, understand the key ratio. You need equal parts sugar and heavy cream by weight, plus about one quarter part butter and a pinch of quality salt. For example, one cup of sugar, one cup of cream, four tablespoons of butter, and one teaspoon of flaky sea salt. That yields roughly one and a half cups of sauce, enough for a full cake.
The process starts with dry sugar in a heavy-bottomed saucepan. Turn the heat to medium and just let the sugar melt on its own. Do not stir it. I know it is tempting, but stirring creates sugar crystals that turn into a grainy mess. Instead, gently swirl the pan occasionally, like you are trying to coat the bottom evenly in a circular motion.
When the sugar turns a deep amber color, like the color of a penny, you are at the perfect stage. This usually takes about six to eight minutes from the first visible melting. If it looks like it is smoking a little, that is fine, just move fast. Have your warm heavy cream ready before you start.
The next moment is the scary part, so listen up. Remove the pan from the heat and pour in the warm cream slowly, while whisking constantly. The mixture will bubble up violently and steam. That is completely normal. Just keep whisking until everything is smooth. Then add the butter piece by piece, still whisking. Finally, stir in the salt.
Let it cool to about room temperature before using. If you pour boiling hot caramel onto ice cream frosting, you will get a melted disaster. Cool it to about seventy-five degrees Fahrenheit, and it will be thick enough to drizzle yet fluid enough to flow. I often test the consistency by lifting my whisk. The caramel should fall back in a lazy ribbon that takes a few seconds to settle.
How to Prepare Ice Cream Frosting That Holds Up Against Warm Caramel
Not every frosting works with salted caramel drizzle. I have tried many combinations, and the best results come from frosting that contains enough fat to stay stable. Cream cheese frosting, stabilized whipped cream, or a meringue buttercream all handle cold temperatures well. Avoid fluffy whipped frostings that are mostly air, because they collapse when you handle the cake.
My go-to is a cream cheese frosting with extra butter. It has a tangy edge that pairs beautifully with sweet caramel, and it sets hard in the freezer. Actually, it gets firm enough to feel like a traditional cake frosting, but it does not crack when you slice it. That balance matters.
To make it, beat eight ounces of softened cream cheese with half a cup of unsalted butter until light and fluffy. Then add three cups of powdered sugar, one cup at a time, and beat on low speed. Add a pinch of salt and one teaspoon of vanilla extract. Beat on high for two minutes, until it is completely smooth. Chill this frosting for at least one hour before spreading.
Now, here is the sequence. Assemble your ice cream cake layers first, then apply the frosting, and freeze the whole thing for at least four hours, or overnight. The cold frosting is the foundation your caramel will sit on. If the frosting is even slightly soft, your drizzle will sink in instead of staying on top.
I usually freeze the frosted cake for six hours before drizzling. That extra time makes sure the frosting is rock solid. The caramel hits the surface, chills almost instantly, and forms that beautiful pattern you see in professional bakeries.
A Step-by-Step Guide to Decorating Ice Cream Frosted Cake with Salted Caramel Drizzle
Once your cake is fully frozen and frosted, bring it out and place it on a serving stand or a cardboard round. You want everything ready close by, because the caramel should be at the right temperature and the cake should go back into the freezer quickly. I like to set up my parchment paper, spatulas, and toppings before I even pull the cake out.
Step one is to check your caramel consistency. The cooled caramel should coat the back of a spoon. If it is too thick, warm it in the microwave for five-second intervals, whisking in between. Do not overheat it, because warm caramel can melt the frosting. You want it pourable but not hot.
Step two is the initial drizzle. Use a spoon or a squeeze bottle for better control. I prefer a squeeze bottle because it creates thin, elegant lines without excess. Start at the top center of the cake and work outward in a spiral, letting the caramel flow down the sides naturally. Do not press hard, let gravity do the work.
Step three is the edge decoration. With your squeeze bottle, trace the border of the top surface. This creates a defined rim that looks intentional. Then, using the back of a small spoon, gently drag the caramel from the edge slightly inward, creating small peaks or swirls. It is like drawing little flower petals, but with caramel.
Step four is the drip effect. For a modern look, let some caramel drip over the edge only about an inch down the sides. Tilt the bottle slightly and move slowly. Then pause, and tap the bottle tip against the side to create a short, broken drip line. It sounds simple, but this small detail makes the cake look professionally styled.
Step five is the finishing touches. Before the caramel sets, sprinkle a pinch of flaky sea salt over the entire top surface. The salt crystals contrast with the dark caramel and add a tiny crunch. If you like nuts, crushed toasted pecans or a mix of almonds work well. Press them gently into the caramel on the sides of the cake while the drizzle is still tacky.
Finally, return the cake to the freezer for at least twenty minutes. This allows the caramel to fully set and adhere. Do not skip this step, because a warm drizzle will slide when you serve it.
Troubleshooting Common Problems with Caramel on Cold Frosting
I have seen so many people get frustrated here, and I totally get it. The number one issue is caramel that turns hard and brittle immediately after touching the cake. That happens when the caramel is cooked too long, or the sugar-to-cream ratio is too high. The fix is to add an extra quarter cup of cream next time and cook it just until the amber color appears.
The second problem is caramel sliding right off the cake. This usually means your caramel is too thin or your cake surface is too warm. Make sure the cake is completely frozen and the caramel is thickened to a ribbon stage, meaning it falls in a thick, lazy stream. If it is already thin, heat it gently to evaporate some moisture and thicken it.
The third issue is a grainy texture. Grainy caramel means sugar crystals formed during cooking. I always wipe down the sides of the pan with a wet pastry brush after the sugar melts, which dissolves any stray crystals. Also, warm your cream and butter before adding them, because cold dairy causes sudden temperature drops that shock sugar into crystallization.
The fourth problem is a burnt, bitter taste. This happens when you leave the sugar unattended, or you cook past the amber stage. Actually, the window between perfect caramel and burnt is only about thirty seconds. So stay near the stove, and keep your nose active. The moment you smell a slightly nutty, toasty aroma, you are at the right spot.
The fifth issue is that the caramel fails to adhere to the frosting and chunks off when you slice. This is about frosting temperature, not caramel. Make sure the frosting is fully frozen and the caramel is applied in a thin layer. A thick puddle of caramel will crack and break away more easily.
What Tools You Actually Need for a Photogenic Caramel Drizzle Finish
People always ask me what tools are necessary, and honestly, you do not need much. A heavy-bottomed stainless steel saucepan is essential, because thin pans heat unevenly and cause hotspots. I use a three-quart saucepot, and it works perfectly for one batch.
A silicone spatula is also non-negotiable. It scrapes every last bit of caramel from the pan, and it does not scratch your equipment. I also keep a rubber spatula for folding and spreading, but silicone is my favorite.
For the drizzling itself, a squeeze bottle with a narrow tip is a game changer. You can buy them at any kitchen supply store for a few dollars. Some people use a spoon, and that is fine, but precision becomes harder. The squeeze bottle allows you to control the flow, which is really what you need for the drip effect.
I also recommend a small offset spatula for spreading frosting and for smoothing the caramel edge. And definitely use a turntable cake stand if you have one. It makes pulling even lines around the sides much easier and faster. You can spin the cake while you squeeze the caramel, creating uniform drips without moving your hands much.
For the finishing salt, I like Maldon flaky sea salt. It has large, pyramid-shaped crystals that are crunchy and visually appealing. If you only have table salt, dissolve a pinch in a teaspoon of water and apply it with a brush. That gives a similar effect without the big crystals.
Flavor Variations for Salted Caramel That Complement Your Ice Cream Cake
Salted caramel is versatile, and tweaking the base recipe can change the whole character of your dessert. I have done dozens of variations, and a few stand out for ice cream frosted cakes.
The most popular is brown butter salted caramel. Before you start, brown half a stick of butter in the pan until it smells nutty. Then add the sugar to that browned butter and proceed with the recipe as usual. The caramel gains a deep, roasted flavor that is incredible with vanilla or chocolate ice cream.
Another favorite is bourbon salted caramel. Add two tablespoons of bourbon right after the cream, and let it cook for an extra minute to burn off some alcohol. The whiskey note pairs beautifully with pecan or coffee-flavored ice cream. Just note that alcohol stays in the caramel, so keep that in mind for kids or anyone avoiding alcohol.
If you want a lighter, fruitier note, add a tablespoon of orange zest and a squeeze of fresh orange juice at the end. This is wonderful with a white chocolate and raspberry ice cream cake. The citrus cuts the richness, and the salt enhances both the sweet and the tart.
For a crunchy finish, you can make a candied salt. Mix a quarter cup of sugar with a tablespoon of water, spread it on parchment, and bake at three hundred fifty degrees for ten minutes. Once it cools, smash it into shards and sprinkle over the caramel. It adds texture and visual drama.
Finally, for a smoky twist, use smoked salt instead of regular sea salt. The smokiness gives the cake a barbecue-confections vibe that some people absolutely love. I use applewood smoked salt for this, and it is fantastic with bourbon ice cream.
How to Store and Serve Your Salted Caramel Ice Cream Frosted Cake
Storing this cake is simpler than you think. After you finish decorating, keep it in the freezer, covered loosely with plastic wrap, or in an airtight cake container. Do not push the wrap directly against the surface, or you will smudge the caramel and frosting. The cover should sit above the cake, leaving a little air gap.
The cake will stay fresh and delicious for up to one week in the freezer. Actually, I think the flavors meld and mature after a day or two, so it tastes even better on day two and three. Just make sure there are no strong-smelling foods like fish or onions near it, because the frosting can absorb odors.
For serving, take the cake out of the freezer about ten to fifteen minutes before you slice it. This softens the frosting and makes cutting clean. Use a sharp, long knife dipped in hot water. Wipe the blade dry between cuts for perfectly smooth slices without cracks.
If you want a warm caramel effect, serve the cake with an extra warmed drizzle on the side. People can pour it over their own slice. That is a clever trick, since the cake itself stays frozen but the warm sauce gives a contrast in temperature. I love doing that at parties.
Expert Tips for Making Salted Caramel Ahead of Time for Decorating Desserts
You can absolutely make the salted caramel sauce two to three days ahead. In fact, I often recommend it. The caramel holds well in an airtight container in the refrigerator, and you can rewarm it gently when you need it.
The trick is reheating without ruining the texture. Place the jar in a bowl of warm water for fifteen minutes, stirring occasionally. Alternatively, microwave in ten-second bursts on low power, stirring between each burst. Never boil the reheated caramel, because that can cause a grainy, separated mess.
When you make it ahead, note that the caramel thickens significantly in the fridge. So before you use it, you need to thin it out. Add a teaspoon of warm cream at a time and whisk, until it reaches pouring consistency. This also depends on what you are using it for. For a thick drizzle, keep it stiffer, and for a thin glaze, add a bit more liquid.
If you are planning a big event, double or triple the recipe and freeze the extra in small mason jars. It keeps for three months in the freezer. When you are ready to use it, thaw overnight in the fridge, then warm gently. This is a lifesaver during the holidays when you make multiple cakes.
One more thing, label your jars with the date and what type of salt you used. Smoked salt, regular sea salt, and fine salt taste quite different, and the caramel will vary accordingly. Trust me, you will not remember which one is which after a week.
My Honest Opinion on Canned Caramel versus Homemade Salted Caramel
I have to be real with you. Canned caramel is convenient, and it can work in a pinch. But for an ice cream frosted cake, homemade is worth the extra fifteen minutes.
Canned caramel tends to be thinner and sweeter. It lacks that deep, toasted flavor you get from cooking sugar yourself. It also has added preservatives and corn syrup, which change the texture. When you drizzle it over a frozen cake, canned caramel often runs off quickly because it is not thick enough.
Homemade caramel has a more complex taste. The slight bitterness from the caramelized sugar balances the sweet, and the salt brings everything together. It also sets more firmly on cold surfaces, giving you that beautiful, defined drizzle that does not disappear into the frosting.
That said, if you are short on time, you can doctor up canned caramel. Warm half a jar of store-bought caramel sauce and whisk in one tablespoon of butter and a quarter teaspoon of flaky sea salt. This improves the flavor and thickens it slightly. It is not the same as from scratch, but it is better than straight from the jar.
Honestly, I would rather do the homemade version. The steps are not hard, and the payoff is huge. Plus, you control the salt level and the exact consistency. Once you get the hang of it, you will never go back to the jar.
Frequently Asked Questions
Can I use salted caramel drizzle on a dairy-free ice cream cake? Yes, you can. Use coconut cream instead of heavy cream, and vegan butter for the butter. The caramel will still set beautifully on cold surfaces. Coconut cream actually adds a subtle flavor that works well with caramel and salt. I have tested this combination, and it held up perfectly in the freezer.
How far in advance can I decorate the cake with salted caramel? You can decorate the cake with salted caramel up to three days before serving. Wait until the cake is fully frosted and frozen, then drizzle and return it to the freezer. The caramel will stay intact, and the texture remains pleasant. Just cover it loosely after an hour to prevent frost from forming.
Why is my salted caramel gritty even after cooking? Gritty caramel usually means sugar crystals formed during the melting stage. Always use a clean, dry pan, and wipe down the sides with a wet brush once the sugar starts melting. Also, add your cream while it is fully warm. That prevents the temperature shock that crystallizes sugar molecules into gritty pieces.
Is it okay to reheat caramel that has been in the refrigerator? Yes, and you should. Reheat it gently in a water bath or in the microwave in short bursts. Stir often, and add a splash of warm cream if it looks too thick. Do not let it boil, because that ruins the smooth texture. I do this all the time for cakes I decorate ahead.
Can I make the caramel drizzle without butter? You can, but the texture will be slightly different. Butter adds richness and improves the mouthfeel. Without it, the caramel may be a bit thinner and less glossy. Replace the butter with a tablespoon of coconut oil, or simply skip it and rely on the cream. The flavor will still be good, but less silky.
⚠️ Warning: This cake is high in sugar. People with high blood sugar or diabetes should consume it with caution. This recipe uses granulated sugar, heavy cream, butter, and frosting with powdered sugar. Each slice contains a significant amount of carbohydrates. If you are using a low-sugar or sugar-free formula, please consult a medical professional before consumption. I always recommend moderation, even for those without health restrictions.





