 bluename
 I still remember the first time I tried making individual jelly fruit tarts for a summer brunch. I thought it would be simple. I was wrong. The jelly slid right off the fruit. The crust turned soggy within an hour. And the whole thing fell apart the second I tried to pick it up. Honestly, I almost gave up on the idea entirely. But after a lot of trial and error, I finally cracked the code. Now, these chilled small handheld dessert servings are one of my favorite things to batch out for parties. And today, I’m going to walk you through exactly how to bake individual jelly fruit tarts chilled small handheld dessert servings without the mess.
If you’ve ever struggled with keeping jelly in place, getting the tart base crispy enough, or just making the whole thing look as good as it tastes, you’re in the right place. I’ll share my exact recipe, the techniques that actually work, and the mistakes I still see people make. By the end, you’ll feel confident enough to whip up a batch for your next gathering.
Understanding the Basics of a Great Handheld Fruit Tart
Before we even touch the oven, let’s talk about what makes a great handheld dessert. In my experience, it comes down to three things. The crust has to hold its shape. The filling has to be stable at room temperature for at least a couple hours. And the jelly topping needs to stay put—not slide, not weep, not turn into a sticky puddle.
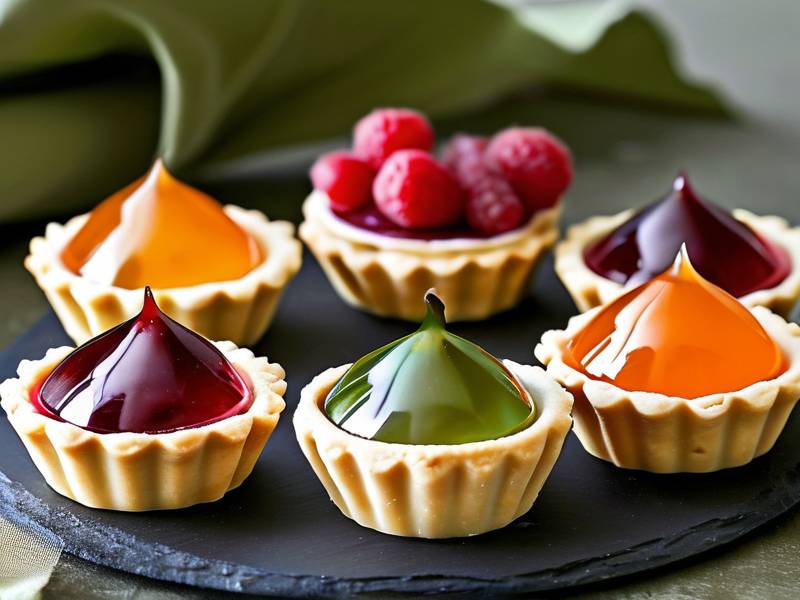
Many people think a tart is just a pie with a fancier pan. That’s not true. A good tart base is firmer and more buttery. It’s baked blind (pre-baked without filling) until dry. For a handheld version, you also need the tart to be small enough to eat in two or three bites. That changes bake time and temperature. I use a 4-inch tartlet pan with a removable bottom. It’s the sweet spot for single-serve portions.
Another thing I learned the hard way—don’t skip the chilling stage. Chilled small handheld dessert servings aren’t just about temperature. Chilling actually helps the jelly set faster and the crust stay crunchy. When you serve them cold, the butter in the crust firms up again. That firms-up texture is what gives you that nice snap when you bite in.
Choosing the Right Tart Pan and Dough
When I started testing individual jelly fruit tarts, I went through three different pan types before settling on my favorite. The key is to look for pans with a non-stick coating and a removable bottom. That little removable disc is a lifesaver when it’s time to pop the tart out without breaking the edges.
As for the dough, I’m team all-butter. Shortening is easier to work with, but butter tastes better. It’s really that simple. And for a handheld dessert, flavor matters. Use cold butter. Cut it into small cubes and keep everything chilled while you work.
A classic pâte sucrée or sweet shortcrust works best here. It’s less elastic than normal pie dough, so it holds its shape better when you push it into the tin. You also want to dock the dough with a fork before baking. That means pricking tiny holes so steam escapes and the base doesn’t balloon up.
Blind Baking Individual Tart Shells Without Sinking
Blind baking sounds fancy, but it’s just a technique to pre-bake the crust before adding the filling. For individual jelly fruit tarts, this step is non-negotiable. If you don’t blind bake, the jelly will seep into the crust and make it soggy.
Most recipes tell you to use pie weights. I do too. But for small tartlets, I have a little trick. Once you line the tart shell with the dough, freeze it for 20 minutes. Then, line it with a small piece of parchment paper and fill it with dry beans or rice. Bake at 375°F for about 15 minutes. Then, remove the weights, poke the bottom with a fork again, and bake for another 5-7 minutes until it’s a light golden color.
One thing to watch out for—shrinking. I honestly struggled with this for a long time. The dough shrinks down the sides of the pan during baking and you lose that little rim. The fix is to leave a 1/4-inch overhang of dough above the edge of the pan. Even though it feels like too much, it shrinks down perfectly to flush.
How to Bake Individual Jelly Fruit Tarts Chilled Small Handheld Dessert Servings
Now we get to the part you actually came for. I’m going to give you a step-by-step breakdown that I’ve used in my own kitchen over and over again. This method produces tarts that hold up well on a buffet table or in a picnic basket.
The complete process takes about 3 hours including chill time. But most of that is passive—waiting for things to set. The actual hands-on time is around 45 minutes.
Preparing the Tart Crust Step by Step
Let me start with a simple ingredient list. You’ll need 1 1/4 cups all-purpose flour, 1/4 cup granulated sugar, 1/2 cup cold unsalted butter, 1 large egg yolk, and 1-2 tablespoons of ice water. That’s enough for about six 4-inch tartlets.
Put the flour and sugar in a food processor and pulse a couple times. Add the cold butter cubes and pulse until the mixture looks like coarse crumbs. Then add the egg yolk and one tablespoon of water. Pulse again. If the dough doesn’t come together when you pinch it, add the second tablespoon of water.
Turn it out onto a work surface. Knead it gently just until it forms a ball. Don’t overwork it. Wrap it in plastic wrap and refrigerate for at least 30 minutes.
Once it chills, roll it out on a lightly floured surface. Aim for about 1/8-inch thickness. Then press it into your tartlet pan. Trim off the excess but leave that 1/4-inch overhang. Freeze for 20 minutes and bake as I described above.
Making the Filling and Prepping Fresh Fruit
Here’s where personal preference really kicks in. I love a combination of fresh strawberries, kiwis, blueberries, and mandarin orange slices. The colors just pop against the jelly glaze. But you can use any fruit you like.
Wash and dry your fruit very well. This is one of those small details that changes everything. Extra moisture on the fruit will dilute the jelly and make it cloudy. Pat each piece dry with a paper towel. Then, arrange them in the cooled tart shell however you like.
For the cream layer, I go with a simple vanilla pastry cream. It’s richer than whipped cream and holds its shape under the jelly. You’ll need 1 cup of whole milk, 2 egg yolks, 1/4 cup sugar, 2 tablespoons cornstarch, and 1 teaspoon vanilla extract. Heat the milk and vanilla in a saucepan. Whisk the sugar, yolks, and cornstarch together in a bowl. Slowly pour the hot milk into the yolk mixture, whisking constantly. Return it to the saucepan and cook over medium heat until it thickens. Let it cool completely before piping it into the tart shells.
How to Create a Smooth Jelly Topping
This is the make-or-break step for chilled small handheld dessert servings. I’ve tested a bunch of jelly options—agar agar, gelatin powder, even store-bought glazes. My go-to is powdered gelatin. It’s reliable and sets firm enough to hold everything together.
For six tartlets, dissolve one teaspoon of unflavored gelatin powder in two tablespoons of cold water. Let it sit for five minutes to bloom. Then, warm 3/4 cup of white grape juice (or any light-colored juice) in a small saucepan. Don’t boil it—just warm it. Stir in the softened gelatin until it’s fully dissolved. Let this mixture cool until it’s just barely warm.
Here’s the important part. If you pour the gelatin mixture over the fruit when it’s too warm, it will melt your pastry cream and slide right off. If you wait too long, it will set into lumps. I wait until it feels like room temperature water. Then, I spoon it gently over the fruit one spoonful at a time.
At this point, you need to chill the tarts immediately. Put them in the fridge for at least two hours. I recommend overnight. The jelly needs that full time to set completely.
Serving and Storing Tips for Chilled Tartlets
You want to keep these chilled all the way until you serve them. That’s why the phrase chilled small handheld dessert servings gets used a lot—it’s the correct serving method. The tarts truly taste best when they’re cold from the fridge. The crust stays crisp, the cream stays firm, and the jelly stays glossy.
If you’re taking them to a potluck or party, use a covered tray with an ice pack underneath. I often place them on a baking sheet and slide them into the fridge for about 10 minutes before I leave. That extra chill helps them travel well.
Storing Leftover Tartlets in the Fridge
These tarts keep in the fridge for up to two days. But I have to be honest—they’re best eaten on day one. By the second day, the crust starts to soften from the moisture in the cream and fruit. If you must store them, do it in a single layer in an airtight container.
Don’t freeze them. I’ve tried it, and the jelly weeps when it thaws, leaving you with a sad, watery mess. Just make what you’ll eat within a couple days.
Mini Tart Variations to Try
Once you master the basic technique, you can play around. I love making a chocolate version by adding an extra layer of melted dark chocolate on the bottom of the crust before adding the cream. It creates a barrier that prevents sogginess and adds another flavor dimension.
You can also swap the pastry cream for a lighter mascarpone-based filling. Mix 1/2 cup mascarpone with 1/4 cup heavy cream and 2 tablespoons powdered sugar. Whip it to soft peaks. That version is less stable but tastes amazing with mango and passionfruit.
Another option is to skip the cream altogether. Just fill the tart shell with fresh fruit and pour the jelly over it. It’s a lighter dessert that’s good if you’re serving lots of food. But I find the cream makes the tarts feel more premium.
Common Mistakes to Avoid With Fruit Tarts
I’ve made a lot of mistakes in my own kitchen, so let me save you some trouble. Soggy crusts are the number one issue. That comes from not blind baking thoroughly or from putting a too-hot jelly onto the cream. Another big one—not chilling the jelly enough before serving. If you cut into the tart too soon, the jelly will collapse and make a mess.
Overcrowding the fruit is also a mistake you want to avoid. It looks beautiful in photos, but if the fruit stacks too high, the jelly won’t coat it evenly. Leave a tiny bit of space between pieces so the jelly can flow and fill the gaps.
Also, remember to clean the edges of your tart shells before serving. Little drips of jelly or cream that sneak out onto the pan can look messy. I use a small offset spatula to gently clean the sides.
Why Temperature Matters for the Jelly
Temperature control is the name of the game here. When I first started, I felt rushed. I’d pour the jelly as soon as it was no longer boiling. Bad idea. The excess heat melted the cream and turned the whole tart into a puddle.
Now, I always test the jelly mix on the back of my hand. If it feels warm but not hot, that’s the sweet spot. Honestly, waiting those extra five minutes is worth it.
How to Pick the Best Fruit Topping
Seasonal fruit is always your friend. In summer, go for peaches and berries. In winter, citrus and kiwi work well. You also want fruit that holds its shape, so avoid anything that breaks down easily like overripe raspberries.
I’d also suggest using fruit that’s not too acidic. The gelatin can weaken if the fruit has a high acid level. If your fruit is very acidic, like fresh pineapple, you might need to increase the gelatin slightly.
Expert Takeaways on Making Jelly Fruit Tarts
A lot of people think making these at home is complicated. But it’s really about sequence and planning. If you prepare components ahead—bake the shells, make the cream, chop the fruit—assembly takes about five minutes per tart. That’s exactly why I love making these for parties.
I would strongly suggest thinking about your time line. The jelly needs at least two hours to set. The crust needs to cool completely. Plan ahead so you’re not rushing to chill small handheld dessert servings at the last minute.
From a nutrition standpoint, these little desserts are a treat. They’re not an everyday food, and that’s okay. There are ways to lighten them up. You can use a low-sugar jelly glaze and a reduced-sugar cream. But for the traditional experience, butter and sugar are part of the magic.
Frequently Asked Questions
Can I use store-bought tart shells for this recipe?
Yes, you can use pre-made tart shells from the store. Just make sure they’re the small individual size and that you blind bake them according to the package instructions. They won’t taste as buttery as homemade, but it does save time.
How early can I make individual jelly fruit tarts before serving?
I like to make them the day before and let them chill overnight. That ensures everything sets properly. You can also assemble them in the morning for an evening event. Just keep them in the fridge until you’re ready to serve.
What jelly alternative works if I don’t eat gelatin?
You can use agar agar powder or flakes. It takes a little more work. I use 1 1/2 teaspoons of agar agar powder dissolved in 1 cup of juice. Boil it for a minute or two, then cool it to lukewarm before using. Just remember that agar agar sets much faster at room temperature, so you’ll need to work quickly.
Bringing It All Together
Making how to bake individual jelly fruit tarts chilled small handheld dessert servings is not as hard as it sounds. Whether you’re a beginner or a seasoned baker, I think the biggest takeaway is to trust the process. Don’t rush the chilling steps. Don’t pour hot jelly over your beautiful fruit. And definitely don’t skip the blind bake.
These little tarts are genuinely crowd pleasers. They look fancy but they’re totally doable at home. I hope you give them a shot. If I can master them after all those early failures, you have a pretty good chance of getting it right on your first try.
Now go ahead and grab your tart pans. I promise you’re going to love eating your results as much as I do.
⚠️ Warning: This dessert is high in sugar and fat. People with high blood sugar, diabetes, or other metabolic conditions should consume it with caution and in moderation. If you have dietary restrictions, consider adjusting the sugar content or consult a medical professional before consuming.





