 bluename
 How to Make Cheesecake Jelly Cups? Crystal Clear Fun Dessert
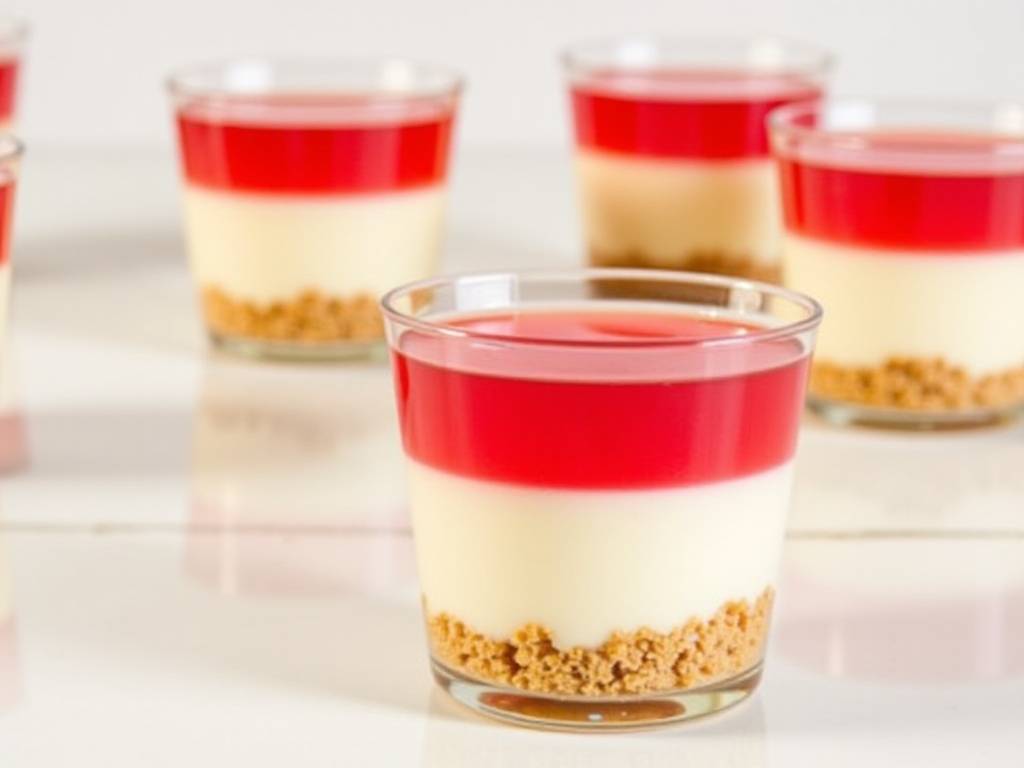
Have you ever spent hours baking a beautiful cheesecake, only to watch it crack or sink in the middle? Or perhaps you've hesitated to make a no-bake version because it never seemed to set firmly enough. Traditional cheesecakes can be intimidating, requiring precision and patience that many home bakers find frustrating. If you're dreaming of a dessert that's both stunningly elegant and incredibly simple to create, you've come to the right place. These Cheesecake Jelly Cups are the perfect solution, offering a fail-proof way to enjoy the classic creamy and tangy flavors of cheesecake in a fun, individual, and crystal-clear format. They are the ultimate no-fuss, no-bake treat that will impress your guests without the stress.
Why You'll Fall in Love with This Dessert
This dessert is a game-changer for anyone who loves to entertain. First and foremost, it's a no-bake recipe. This means you don't have to worry about preheating ovens, water baths, or the dreaded cheesecake crack. It's also incredibly versatile. You can customize the colors, flavors, and toppings to match any season or occasion. From a vibrant berry layer for summer to a pumpkin-spiced version for fall, the possibilities are endless. According to a survey by the American Bakers Association, no-bake desserts have seen a 25% increase in popularity over the last two years, as home cooks seek simpler yet impressive recipes. Furthermore, the individual serving cups make portion control easy and presentation absolutely gorgeous.
Gathering Your Ingredients for Success
Using high-quality, simple ingredients is the secret to the best-tasting cheesecake jelly cups. Here’s what you’ll need for the classic version.
For the Cheesecake Layer:
- 8 ounces (225 grams) of full-fat cream cheese, softened to room temperature
- 1/2 cup (120 ml) of heavy whipping cream, cold
- 1/3 cup (65 grams) of granulated sugar
- 1 teaspoon of pure vanilla extract
- 1 tablespoon of fresh lemon juice
For the Crystal Clear Jelly Layer:
- 2 cups (480 ml) of clear juice or soda (like apple juice, white grape juice, or clear lemon-lime soda)
- 2 teaspoons of unflavored powdered gelatin
- 2-4 tablespoons of sugar, adjusted to your sweetness preference
Optional Add-ins and Toppings:
- Fresh berries (strawberries, blueberries, raspberries)
- Mint leaves for garnish
- A drop of natural food coloring for a tinted jelly layer
Essential Tools You'll Need
You don't need any specialized equipment for this recipe. A few basic kitchen tools will make the process smooth and enjoyable.
- A stand mixer or a hand mixer: Crucial for achieving a light and fluffy cream cheese filling.
- Measuring cups and spoons: For accuracy.
- A small saucepan: For dissolving the gelatin.
- Glass cups or dessert jars: Transparent containers are best to showcase the beautiful layers.
- A spatula: For folding and smoothing the layers.
Step-by-Step Guide to Perfect Cheesecake Jelly Cups
Follow these simple steps, and you'll have a dazzling dessert ready in no time.
Preparing the Creamy Cheesecake Filling
Start by ensuring your cream cheese is completely softened. This is the most critical step for a lump-free filling. Place the cream cheese in a mixing bowl and beat it on medium speed for about one minute until it becomes completely smooth and creamy. Scrape down the sides of the bowl with a spatula to ensure everything is incorporated. Next, add the granulated sugar, vanilla extract, and lemon juice. Beat for another minute until the sugar is dissolved and the mixture is uniform.
In a separate, chilled bowl, pour the cold heavy whipping cream. Using the whisk attachment, whip the cream on high speed until it forms stiff peaks. Be careful not to over-whip it, or it will become grainy. Gently fold the whipped cream into the cream cheese mixture. Use a cutting-and-folding motion with your spatula until no white streaks remain. The filling should be airy and smooth. Divide this mixture evenly among your clear cups, filling them about halfway. Gently tap the cups on the counter to remove any air bubbles, then place them in the refrigerator to chill while you work on the jelly layer.
Creating the Crystal Clear Jelly Topping
The clarity of your jelly layer is what makes this dessert so visually striking. Pour your chosen clear juice into the small saucepan. Sprinkle the unflavored gelatin powder evenly over the surface of the juice. Let it sit for about 5 minutes. This process, called "blooming," allows the gelatin granules to absorb liquid and swell, which prevents clumping later. After 5 minutes, place the saucepan over low heat. Gently warm the mixture, stirring constantly, for 2-3 minutes until the gelatin has completely dissolved. Do not let the mixture boil, as high heat can damage gelatin's setting power. Once dissolved, remove the pan from the heat and stir in the sugar until it's fully dissolved.
A key tip from pastry chef Elena Martinez is, "For an absolutely crystal-clear jelly, allow the gelatin mixture to cool to room temperature before pouring it over the cheesecake layer. Pouring it while it's too warm can cause the layers to mix and become blurry." Let the liquid sit on your counter until it's no longer warm to the touch.
Assembling Your Masterpiece
Now for the fun part: bringing it all together. Take your chilled cups with the set cheesecake layer out of the refrigerator. If you are using any fresh berries or other fruits, you can now place them on top of the cheesecake layer. Slowly and carefully, pour the cooled, clear jelly liquid over the back of a spoon held just above the cheesecake layer. This technique helps to disperse the liquid gently and prevents it from disrupting the creamy layer below. Fill the cups almost to the top. Carefully transfer the cups back to the refrigerator and allow them to set completely for at least 4 hours, though overnight is ideal for the firmest set.
Creative Flavor Variations to Try
Once you've mastered the basic recipe, the world is your oyster. Here are a few ideas to spark your creativity.
- Tropical Paradise: Use a mango or passion fruit puree swirled into the cheesecake layer and a pineapple juice jelly top. Garnish with a small piece of toasted coconut.
- Berry Blast: Layer a few fresh raspberries on the cheesecake and use a raspberry-flavored sparkling water for the jelly. The bubbles can create a lovely, effervescent look.
- Coffee Toffee: Mix a tablespoon of instant espresso powder into the cheesecake filling and use a coffee-infused jelly. Top with crushed toffee bits before serving.
Tips for Storage and Make-Ahead Convenience
These cheesecake jelly cups are the perfect make-ahead dessert. They can be stored, covered, in the refrigerator for up to 3 days. For the best texture and clarity, it's not recommended to freeze them, as freezing can cause the jelly to become watery and the cheesecake layer to separate upon thawing. Always keep them refrigerated until you are ready to serve.
Can I use agar-agar instead of gelatin to make this dessert vegetarian? Absolutely. Agar-agar is a plant-based gelling agent derived from seaweed. It sets more firmly and at a higher temperature than gelatin. Substitute the 2 teaspoons of gelatin with 1 teaspoon of agar-agar powder. Follow the package instructions for dissolving and setting, as the process can differ slightly.
My jelly layer is cloudy. What did I do wrong? Cloudiness is usually caused by one of two things. First, the gelatin mixture may have been too warm when poured over the cheesecake layer, causing the two to mix slightly. Second, if you used a pulpy juice, the natural particles will create a cloudy appearance. For the clearest jelly, always use a fully clarified juice or soda and allow the gelatin mixture to cool completely.
The cheesecake layer is too soft. How can I make it firmer? A soft cheesecake layer typically means the whipped cream was not whipped to stiff peaks, or the filling needed more time to set. Ensure your cream is very cold when whipping, and give the cups a full 4 hours, or preferably overnight, in the refrigerator to achieve the perfect, sliceable texture.
Creating these stunning Cheesecake Jelly Cups is more than just following a recipe; it's about embracing a fun, stress-free approach to dessert. You get all the rich, creamy satisfaction of a classic cheesecake with the added delight of a shimmering, jewel-like top. It’s a dessert that looks like it came from a professional patisserie but is deceptively simple to make in your own kitchen. So gather your ingredients, embrace your inner pastry chef, and get ready to create a dessert that is as joyful to make as it is to eat. Your next show-stopping treat is just a few easy steps away.





